Showing posts with label vintage. Show all posts

Thursday, May 14, 2015

She Wears The Pants - A Sewing Pattern Book Review

A more unusual Japanese pattern book has just been translated into English and published by Tuttle Books. 'She Wears the Pants' is a take on what has been called boyfriend style clothes.


It was originally published in 2010 with the Japanese title which translated as 'She Has a Mannish Style'. Despite being published 5 years ago, the patterns have a very current look, with a few classics also included.


There are 20 varied patterns in this pattern book, including 7 blouses/tops, 4 jackets/coats/cardigan, 4 trousers/culottes, 2 dresses, one skirt and 2 accessories stole/long collar.


Some of the patterns, like the draped mini dress and the square top, follow the typical loose-fitting style of Japanese patterns. However, more fitted styles such as the tapered trousers and culottes above are also included.


The sizing is in the range from XS to L. XS corresponds approximately to US size 6, and size L corresponds to US size 14. Because the sizes are nested on the pattern sheets, it would be easy to size up one or two sizes while tracing a pattern.

This book also has an excellent centre section with pictures and tips on sewing with different types of fabrics and how to finish seams on different fabrics

As with many Japanese Pattern books, all the patterns are included on pull-out sheets in a pocket inside the back cover and patterns must be traced from these sheets.

Instructions for sewing up each pattern are listed in numbered steps, with numbers linked to those on the corresponding diagrams. Sometimes a particular step is described and illustrated only for an earlier pattern, but usually the page number is given if a step from a different pattern needs to be used.

Seam allowances are not included, but the fabric layout diagrams show the exact allowance that is needed for each pattern piece.


Some of the styles in the book would not suit my shape as I need my clothes to be a little fitted above my waist. Other styles are a little too 'edgy' for my taste. However what I found most impressive about this book was the inclusion of classic shirt and jacket patterns.

The fleece and striped long jackets as well as the dotted blouse are classic styles and include details like welt pockets, bound buttonholes, sleeve plackets and collar and under collar, which are thoroughly illustrated with clear detailed diagrams.


What make me love this book is the diagram on 'bagging a jacket'. This sewing technique is generally difficult to describe in words, and also difficult to demonstrate and photograph with an actual jacket, but this book provides a detailed, numbered line-drawing. I have quite a collection of Japanese language pattern books and English translations, and this is the first I noticed with this type of jacket diagram.


The pattern I had planned on sewing from this book is this draped mini dress, but life got in the way a little, so instead I chose to use part of another pattern.


My son wanted a costume for Cork Comic Expo which was held a few weeks ago in a local shopping centre, Mahon Point. The costume was a black cape and hat for 'V for Vendetta'. I had to draft the hat myself, but used a vintage pattern for the cape. However, the Cape pattern didn't include a collar, so I needed a well-designed curved collar pattern which would stand up well. I found No.18 Dotted Blouse had exactly what I needed and traced the collar and collar stand. The only change I needed to make was to increase the size of the lapels to provide the look that my son wanted.
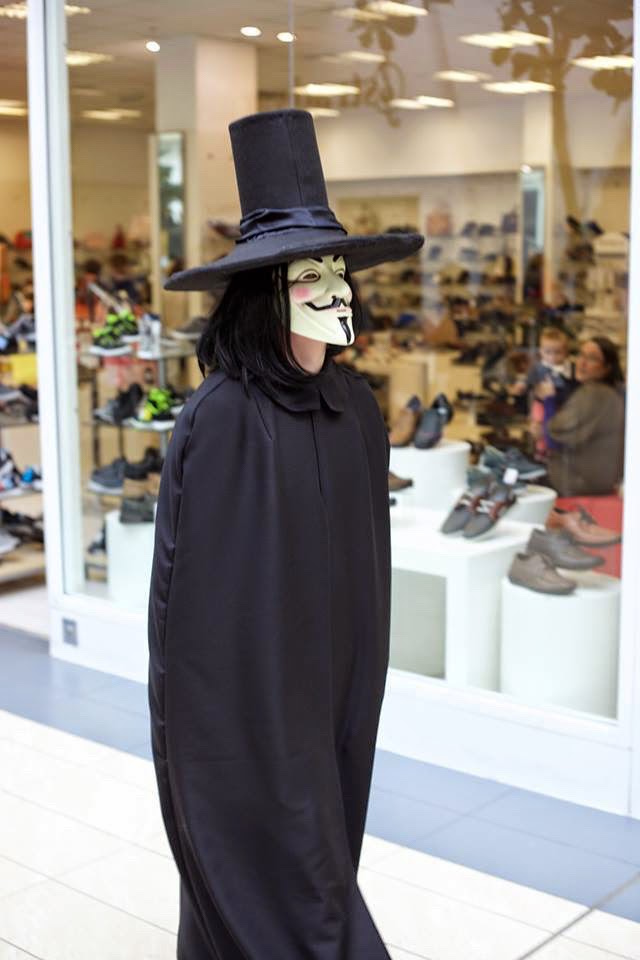
(Pic source: Facebook Mahon Point)


I think he got the look!


(Tuttle Publishing sent me this pattern book free. All opinions are my own. I have been successfully sewing from Japanese language pattern books since 2009)


Pin It Now!  

Tuesday, December 30, 2014

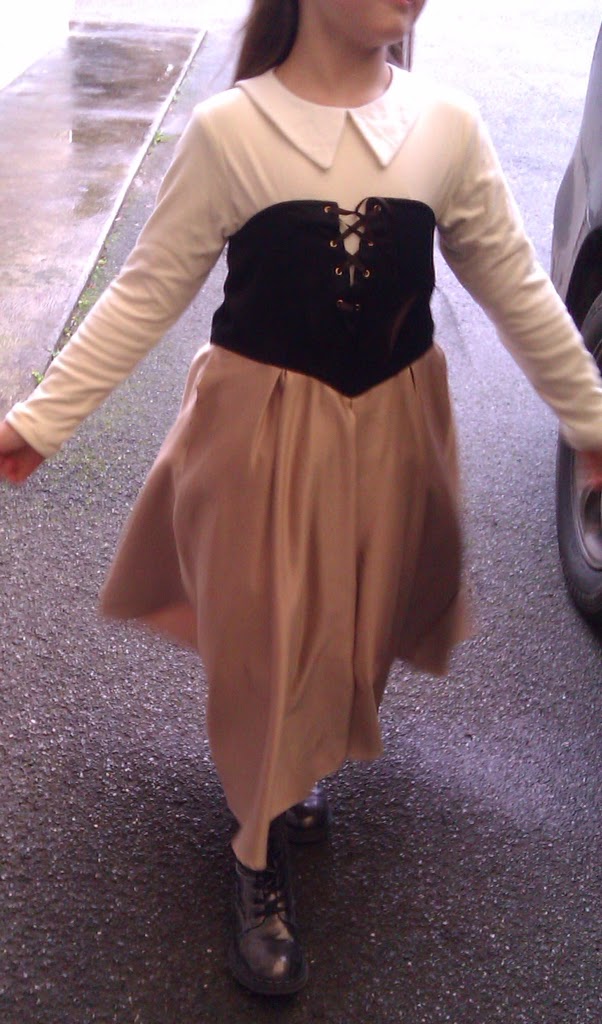
Sleeping Beauty - A Costume for the Panto.

As Christmas (aka pantomime season) and my daughters birthday are close together, her godmother takes her to a pantomime in Cork, our nearest city. As part of this treat, my daughter likes to wear the costume of the main character. So in the past I've sewn an Alice dress, a Cinderella dress (not blogged), and this year it was Sleeping Beauty's turn.


Pink is the colour most associated with Aurora/Sleeping Beauty's dress, but in the film and books, she wears a different dress before she 'falls asleep'. Though my daughter hasn't quite left the 'pink phase'! she didn't take much convincing when I showed her pictures of the other dress worn by Aurora.
An online search for images of the dress, led me to pick View 2 of this vintage Advance pattern 5816 that I already had, because of its v-shaped bodice and skirt.
The main additions the skirt pattern needed was length, and extra fabric added to the centre front and centre back to create pleats. I also curved the top of the bodice at the front and back armholes and cut a centre front seam so that I could create a lace-up bodice.
The sleeves and upper bodice were adapted from Butterick 5890. I recently used this pattern for the Elsa Coronation dress which I sewed for Halloween. I had to draft the white collar myself using a flexible ruler, then measuring the neckline curve once I had sewn the shoulders of the front and back bodices. I've never drafted a collar before, so was surprised and pleased that it lay flat and looked so good.


The dress turned out exactly as we both imagined, especially the centre front which has eyelets and is laced up with narrow grosgrain ribbon.


The fabrics are all from Vibes and Scribes, a well-stocked fabric, wool and haberdashery shop in Cork that now delivers online. The top bodice is cream cotton jersey, the main bodice is a soft-textured black polyester, and the skirt is a medium-weight sateen which was the last piece on the bolt.


Though it seemed like I was cobbling together parts of patterns, and making up pieces and instructions as I went along, the dress worked and most importantly she was delighted with it.


Pin It Now!  

Saturday, September 14, 2013

Sewing Aprons with Ribbon Straps ...

... and links to Free Apron Patterns


Having sewn very little over the summer holidays, I decided on some easy sewing to get me motivated again. As a gift for a couple who got engaged, I thought aprons might be appreciated. There are lots of apron sewing patterns available, so I chose two, the Emmaline Apron from Sew Liberated and a free apron pattern from a collection on the Internet.


The Emmaline Apron was the more difficult to sew of the two aprons, mostly because I changed the pattern to include ribbons instead of making straps. This might not have been the best choice for a reversible apron, as I had to use a double layer of ribbon, but I think it worked.


The skirt portion of the apron involves sewing the 2 layers of fabric wrong sides together, then turning the right sides out.

On the other hand, the two fabric layers of the top or bodice portion are gathered and sewn with the right sides facing out. The ribbon is then sewn around all the raw edges on both sides for a neat finish. I chose a few different spotty ribbons from janemeans to complement the colours of the stripes and flowers.


I love that it's reversible, and the floral Alexander Henry print is a perfect foil to the stripes on the other side. Having sewn a shark shirt for my husband for last Father's Day, I'm a very recent convert to these great fabric prints.


The Emmaline apron pattern is one of the most unusual apron designs I have seen. As utility items, aprons can generally be shapeless and are simply created to cover garments. This apron has an empire waistline, so the straps tie a little higher than the waist. The darts in the skirt combined with the gathers in the bodice create a very 'shapely' apron (as seen in the pattern pictures), that begs to be worn for eating as well as cooking!


The second apron is from an excellent collection of free apron patterns on the Internet. The specific pattern I adapted came from a vintage pattern e-book (page 6). Men, those that I know at least, tend to not use aprons much, so choosing camouflage fabric was my way of hoping it would be worn!

My efforts at taking pictures of it were comical. I chose the garden so I would have space to open out the aprons, totally forgetting about the camoflage fabric!


This apron was surprisingly easy to sew considering I thought there would be difficulties with the seams on the curved sides due to stretching. Folding in the raw edges twice, 0.5cm and then 1cm and pressing them made the sewing very quick. I also used ribbons on this apron, but chose striped janemeans ribbons. The ribbons were pushed under the last 1cm fold, then brought around to the front and sewn. All the corners are mitred for a neater finish.


The ribbon for the neck straps is strengthened by sewing two ribbons together. To make the neck straps adjustable, I added a loop with D-rings which will hopefully allow for a better fit.


And a final picture showing how effective the camouflage fabric actually is!


It might a very interesting experience to wear this camoflage apron for the garden barbecue!


Pin It Now!  

Monday, April 8, 2013

Vintage-Inspired Girl's Raincoat

My daughter needed a raincoat - this is Ireland after all! With the weather forecast promising wet and mild weather here for April, I finished it just in time.

This has been on my to-do list for a while, but needed to be sewn because I only had a metre of the green polka-dot coated cotton from Westfalenstof, barely enough for my 6 year old. As I planned to make a raincoat, keeping the number of seams to a minimum to ensure it would be waterproof was a priority.

This all led me to choose a raglan coat because I love that vintage style and thought it might use less fabric than a coat with regular sleeves.


Raincoat with hood (colour is washed-out in this pic

Perhaps I was looking in the wrong places, but finding a modern pattern for a child's raglan-sleeved coat proved impossible. I resorted to Pinning images of vintage raglan-sleeved coat patterns and eventually decided to draft my own. Using Cal Patch's book and my daughters measurements I had no problem with the front and back pieces, but got stuck on the sleeves. Should they be in one or two pieces, should I draft following Aldrich or Armstrong? ...... Stuck .... until I saw that Sew Magazine (April’13, issue 46) had a pattern for a child's raincoat, age 2-4, with ...... raglan sleeves! The magazine also has 2 pages, 38-39, of helpful information for sewing with waterproof fabrics. It took a bit of work, but grading up raglan sleeves, proved easier than drafting from scratch.

Of course the sleeves are not perfect, but it's a wearable raincoat, and I really couldn't wish for more than that with a first effort at drafting, and not even sewing a muslin!

The colour combinations of pink and green really appeal to me so I added cuffs in a coated cotton from Hilco via Dotsnstripes. I added a little label from Farbenmix, just for fun!

With all my emphasis on the sleeves, I nearly forgot to mention that I drafted the hood from scratch, using Aldrich. It could be a little bigger, but fits and I was so pleased that I had enough fabric left for it.

There is a general theme of nearly running out of fabric throughout this post, and so it is for the green cotton lining fabric that I bought locally - didn't have enough for the sleeves, so I used a different cotton for them.

This is a picture of the inside, which also shows the zip cover/placket at the centre front which I drafted separately. I used a zip from an old raincoat of my daughters and the Velcro was leftover from my Minoru.

Not having consulted with my daughter on the design or the fabrics, I asked her if there was anything she wanted to add - her request was for pockets (for what is now an obvious reason!). So after checking my Pins for inspiration, I went with patch pockets.

She also picked the ribbon type and colour for the hanging loop and the zipper pull - details that are so tiny hat they could be missed, but are important to her. The colour of the ribbon came up blue in the picture, but is a purple stitched ribbon from janemeans, which picks up a purple in the lining. (And most recently seen threaded through lace by Ann on The Great British Sewing Bee!)

Unlike my Minoru, I didn't tape any seams in this coat so it remains to be seen how much rain it will keep out. Of course I don't intend to let my daughter out in a downpour to test it out, much as she'd probably love that!


Pin It Now!  

Sunday, December 30, 2012

A Vintage Christmas Dress

Quite a bit of sewing and posting to catch up on here ...... again. The light for taking pictures is generally just too dull, so I've been waiting for good light ... and it hasn't made much difference!

This is the dress I sewed for my daughter for Christmas. The fabric is from two old dresses, but It ended up being more work than I expected, possibly because of the 'drapiness' of the fabric.

I had Pinned this dress pattern because I loved the style, so when I saw it on eBay, I (obviously) couldn't resist! I sewed the bodice exactly as in the pattern, and avoided facings by adding a lining of cotton voile instead.

However, the skirt is sewn differently. Instead of adding a side zipper, I changed the pattern by turning it into a wrap dress.

The dress fabric is a silk velvet and was worn as bridesmaids dresses for my wedding .... a while ago! I used one dress and just about had enough for the remake, except the sleeves needed to be cut in two pieces to fit the fabric available.
When originally worn, the fabric was quite dark (winter wedding) so I changed the direction of the nap, basically turned the dress upside down, and now the colours are much stronger.

The collar and cuff fabric is from an old maternity dress of mine.

Though the dress looks ok, the fabric would have been more suited to a less detailed pattern. There is also lining and tulle added to the skirt to give it some badly needed 'poofiness' and it needed to be worn with a separate petticoat to give it some extra lift. It was almost a zero cost dress, as I didn't have to specifically buy anything for it.

It was given the thumbs-up by my daughter which, as always, is what matters most!


Pin It Now!  

Friday, August 31, 2012

Vintage-inspired school uniform

Despite the bad weather this summer, we have managed to have a busy few months, which accounts more for the radio silence here, rather than the lack of sewing. We had a relatives wedding where the children were not invited, so they got to stay on the farm where I grew up. They milked cows, fed calves, got stuck in mud and stayed up late with cousins. They have been talking about it since!

I have been sewing, and made a chiffon dress for myself to wear to the wedding - just need some full length pictures before I post about it. I hadn't intended sewing any school clothes, but I had started this dress and blouse last year, and decided to finish them.

This dress has been in my head for about 2 years or more. In old family photos from the 1940's and 1950's, I noticed the school uniforms had a small square yoke, with a pleated dress and belt, so this is what I sewed.

Though there are vintage patterns available in this style some of which I have pinned, I couldn't find one in the right size.
What I found, after some searching, was a European sewing magazine for teenagers called Trndz from 2008. The pattern had to be sized down, and I omitted the waistband and the sleeves. All the pleat edges are edge stitched, both inside and outside, to ensure they hold their shape. Also the pattern instructions are not in English - it needed some thinking and planning to decide the sewing order!
 

Like the Oliver+S uniform dress I sewed last year, this dress also has a fun lining for my animal-loving daughter. The square yoke is lined with a Robert Kaufman cotton with pink frogs and the pockets are sewn with the same fabric. There's some Liberty bias binding on the armholes.


But my favourite part is the belt. The belt came together almost by accident, as I was hoping to avoid the time-consuming interfacing bit. I had already tried making a belt from 'D-rings' and janemeans ribbon, and this belt has a similar look.

It struck me that the belt could be strengthened from the outside rather than the inside. I sewed this sweet cat ribbon from janemeans on the underside of the belt which works perfectly instead of interfacing and it also adds another fun element to the uniform. My daughter was very surprised when she saw the finished belt, and was amazed that she would be able to wear the cats as part of her uniform.

The green ribbon hem picks up the green of the lining fabric and is a wired ribbon from janemeans (I removed the wire!). Ribbon is a good choice for this hem which is straight, a curved hem edge would need bias binding.

This picture is windswept and my daughter decided to practice a few poses after her first day back at school, but it shows how effective the edge stitching is in holding the shape of the pleats.


If I was making the dress again, I would cut the yoke smaller, especially across the shoulders, and I would leave a larger hem allowance, using this method by Sherry to turn up the pleated hem.


The dress turned out better than I expected, and will make a perfect winter uniform, because the fabric is a lightweight wool.


Edited to add: Linked to Justine's Sew & Tell Saturday Pin It Now!