Showing posts with label Belcarra Blouse. Show all posts

Sunday, May 18, 2014

How to Sew a Ribbon Hem

Sewing ribbon to the hem edge of a garment is an easy finishing technique. It adds an extra detail and can also be used to preserve the length of the hem. I regularly use ribbon to finish hems as well as sleeve and neckline edges, though I wasn't always confident in doing so. The soon-to-begin Belcarra Sewalong means that it's as good a time as any to show how I sew ribbon hems.


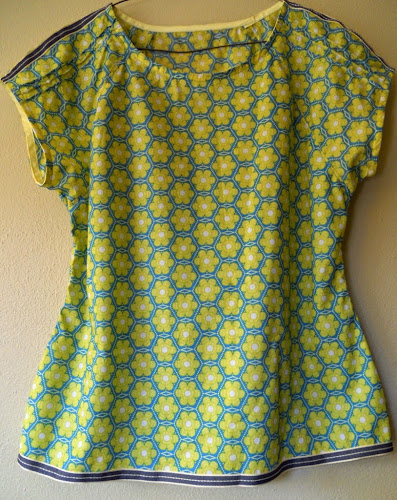
I sewed ribbon hems for the two Belcarra blouses from Sewaholic Patterns that I recently made. I liked the unhemmed length of the blouses, and didn't want to turn up a full hem. Also, the fabric in both was lightweight, so I wanted to add a little weight to the hems.


A huge variety of ribbons will work for hemming purposes. It is useful, but not necessary, to match the ribbon type with the fabric type. For the beige Liberty tana lawn cotton Belcarra blouse, I used a cotton stitched ribbon from janemeans. For the green AnnaMarie Horner cotton voile blouse, I used a polyester ribbon also from janemeans.

I would strongly recommend prewashing the ribbon in the same manner that you will treat the finished garment.


What you need:

-A sharp/new sewing machine needle

-Good quality grosgrain or cotton ribbon, the same length (+1.5cm overlap) as the hem

-Matching thread colour - matched to the ribbon colour rather than the fabric.

-Garment with side seams sewn & finished, ready for hemming


Step 1:

Place the wrong sides of the fabric and ribbon together. If the ribbon doesn't have a wrong side, choose one side as the wrong side.

Place the ribbon on the fabric so that the right side of the ribbon and the wrong side of the fabric both face up as in the picture

Ensure the ribbon overlaps the fabric edge by approx 1cm or up to half the width of the ribbon.


Sew the long left edge of the ribbon to the hem edge using a long stitch length. The line of stitching should be approx 2-3mm in from the long left ribbon edge.


Step 2:
When you have stitched all around the hem, cut the ribbon allowing for an extra 1.5 cm to fold under. Fold the end of the ribbon in by 1.5 cm and continue sewing. Backstitch when you have sewn the overlap. This line of stitching will become the lower edge of the garments hem.


Step 3:
Turn the garment so that the right side of the fabric faces upward. Fold the ribbon over at the stitching line, so that the ribbon covers the raw hem edge and the right side of both the ribbon and the fabric are facing up. Press the ribbon and fabric.


Step 4:
With the right sides of the fabric and ribbon facing upwards, sew along the edge of the ribbon, enclosing the raw edge of the fabric.


Step 5

When you reach the folded short end of the ribbon, sew across the ribbon width and backstitch to finish.


Step 6:

Press hem edge again.


This technique works perfectly on straight hem edges, but will also work on a slightly curved edge. If you wish to sew a ribbon hem on a circle skirt/dress edge, a narrow ribbon will work better.


Pin It Now!  

Wednesday, April 23, 2014

Belcarra Blouse - So good I sewed it twice!

The newest pattern from Sewaholic Patterns is the Belcarra Blouse, and I had the opportunity to test the pattern before it was released.

The style is a looser silhouette than I usually wear, but what surprised me most about the pattern was how the 2d curved pattern shapes transformed to 3d without needing darts or other fitting techniques. Though it is a loose-fitting style, it works by also being shapely...or making the wearer look shapely!

The size I cut was 12 and this is what usually fits me best in Sewaholic patterns. Sometimes I have to shorten above the waist, but I didn't do that for the Belcarra, as my measurements of the pattern pieces in comparison to my body measurements indicated I didn't need to.


The biggest difficulty I had with this blouse was fabric selection I just couldn't decide what to use. I originally planned on a medium weight black and white cotton gingham but thought that the loose style of the blouse wouldn't be as flattering in a heavier fabric. So I picked Liberty of London cotton voile 'Toria' that I'm delighted with.


http://sewaholic.net/also-introducing-the-belcarra-blouse/


Tasia's advice on choosing fabric for this blouse is spot on - pick something special, because the lack of front and back seams and darts mean that the fabric gets the limelight!! Her Liberty of London version illustrates her advice perfectly.


I chose to sew View B mostly because of the tucks in the raglan sleeves. They are such a neat detail on this lovely simple design. As the print on the fabric is so busy, the tuck detail seemed to get lost, so I added some matching janemeans ribbon to the shoulder seam to help draw attention to the tucks.


Using the same stitched ribbon as I used to cover the shoulder seams, I repeated the ribbon detail at the hem. I liked the unhemmed length of the blouse, so adding ribbon meant that I could keep most of the blouse length.
 

As the voile fabric is so light weight, I wanted to ensure it would hang well. Another reason for sewing a ribbon hem is that it adds a little extra weight to a fabric like voile.


The second Belcarra blouse was a very quick make-not even a couple of hours! The fabric is also a cotton voile from AnnaMarie Horner. This version came about as a result of #misemademairt / #misemademáirt (general Irish to English translation = Me Made Tuesday). Three of us - also Maeve & MsMcCall - from Ireland have been wearing something we made ourselves for Tuesdays in Feb and March and posting on Instagram. This was my attempt to wear something me-made and green(ish) for St. Patricks Day.

For this version, I slightly adjusted the neckline. The neckline in the pattern pictures seemed wider than I prefer, so I made a simple adjustment by adding an extra seam allowance width to the top of the sleeve pieces and back and front pieces. I also measured the resulting neck opening and compared it to my head measurment to be sure it would fit! The length of the neck binding also needs to be reduced to fit the new neck opening measurment.


Even though the blouse is a simple style, there are some neat techniques in the pattern. The bias binding is sewn doubled over and this gives a nice flat finish. The sleeve cuffs are also well designed. I didn't compare my arm measurements with the cuff length, before cutting and sewing. The sleeve cuff fits, but I would usually wear it a little looser.

The blouse makes for a very easy-to-wear top and I love the raglan sleeves. Now that I know that the style fits in a flattering way, I would like to try it in gingham, with a bias pocket and tucks on the sleeves forming a neat design with the lines of the gingham fabric.


Pin It Now!