Friday, September 30, 2016

Upcycling Denim Jeans to Sew a Guitar Strap

After upcycling a shirt to a child's sailor dress for last years Refashioners series (on the Makery blog), I had no intention of sewing along this year. Of course life has a habit of getting in the way, especially when we make plans!


My unintentional participation this year is all due to my 16 year old son. He decided in January to learn the guitar and with patience & perseverance (and a couple of online classes) did exactly that. He has since encouraged and motivated his younger brother to enthusiastically learn.

Guitar straps are not generally expensive, but when my older boy then asked me to sew one for him, there was no way I could refuse!


He wanted a very long strap, but really had no other specific requests or requirements. After doing some research (specifically checking out the guitar straps used by the Beatles) I realised that straps didn't need to be as wide as many are nowdays.


This year's Refashioners series 2016 is all about denim jeans, and there are some fascinating and detailed sewing projects on the Makery blog that are worth checking out.


I decided to sew the guitar strap from denim for strength and chose a pair of jeans that were long past their sell-by date!


The white plastic slide buckles or strap adjustors were taken from an old baby sling, these determined the width of the guitar strap. An old leather belt was cut up to attach the strap to the guitar.


I measured the strap that my son wanted and added more to allow for lengthening. The denim was cut in two pieces, each on a fold and sewn inside out, with leather pieces sewn into the ends.


This may not have been the best approach as I spent hours trying to turn the right side out for the long strap. The only reason that I didn't rip/unpick my stitching is because I thought it would weaken the join with the leather. The effort was worth it as the strap which was really only a prototype is looking like it will last a while!


Even after managing to turn the strap, the structure still took some figuring out. I was determined to make the strap as strong as possible, as I has joined two pieces of denim in the middle of the strap. I was worried that the join would be a weakness so sewed one long piece of ribbon along the full length of the strap. I picked a red denim style Jane Means ribbon to sew on the inside of the strap as per my son's request (though I would have secretly preferred it on the outside).


The plastic strap adjustors were more straightforward to attach after all the difficulty turning the strap.


All that was left was to cut a hole in the leather strap ends so that the strap would fit on the guitar. It is very comfortable for my son to wear so the shoulder padding piece which I have also cut from the denim jeans has yet to be finished.


Pin It Now!  

Tuesday, September 27, 2016

Pattern Testing & New Azaire Pattern Giveaway [Closed]

Update: Giveaway closed & thank you for the comments. The pattern goes to comment number 4! Congratulations Carmen, I'll be in touch.


The Azaire dress and top is the newest sewing pattern from Gather and I was lucky enough to be a pattern tester. Caroline and Sandra (from Gather) have also offered me a copy of the pattern to give away!


The Azaire pattern comes with a detailed instruction booklet which includes size charts (sizes 8 to 18), fabric requirements, body and finished garment measurements, fabric and cutting layouts and very helpful diagrams illustrating the sewing instructions.


I sewed the Azaire dress (wore it to a wedding) and had an excellent pattern-testing experience particularly as the end result is a dress that I love wearing.


Though my measurements fall between 12 and 14, the "Finished Garment Measurements" included with the pattern indicate that the Azaire has a loose silhouette so I chose to sew size 12.


I enjoyed the whole process of testing this dress. My choice of fabric wasn't the best, being transparent! This meant I had to add an extra lining to the centre front and back of the dress.


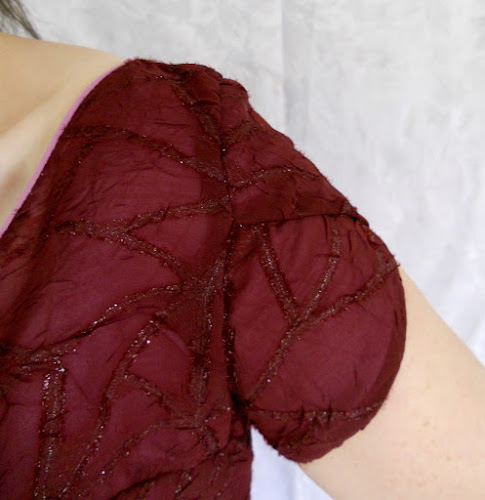
The details of this dress allow for customisation and mixing different fabrics to highlight the style lines. It has a curved yoke, boat neckline, hi-low peplum, two sleeve options and front and back seams for fitting. Initially I wondered if the silhouette was too loose, but the style lines mean that the dress and top can be easily fitted. After testing the pattern, I fitted the dress more at my waist by sewing curves on the front style lines.


The pattern includes short petal sleeves on the dress and these are probably the most complicated aspect of the pattern. The sleeves are lined and overlapped so there are four layers of fabric to keep under control. The instructions for the sleeves are detailed and easy to follow. My only suggestion would be to muslin or fit the sleeves as I found them narrow-fitting. My 'strong' upper arms from heaving lifting in my previous nursing career means that I often have to take account of this!!


The pattern pieces all fit together perfectly and I was particularly pleased with how neatly I was able to match the back seams at the invisible zip.


It was such a joy to test the Azaire and I would love to pass a little of that on.


Just comment below with a way to contact you by email and I'll randomly pick a name next next Monday Oct 3rd. I will post anywhere in the world.


Pin It Now!  

Wednesday, August 31, 2016

Upcycled Shirt/Apron and an Ergonomic Oven Glove!

Having large selection of Japanese Pattern Books means that there are quite a few that I haven't sewn from.


'Cotton Friend' is a more unusual Japanese Pattern Book in that it resembles a magazine rather than book format. I would have loved to subscribe to a Japanese pattern magazine like this, but I can safely say that won't happen unless I get around to doing a Japanese language course!


Sometimes, patterns stand out & are put on the mental, never-ending to-do list. This apron pattern from 2010 is one that I always thought was a clever use of fabric. It came to mind when I found the perfect shirt fabric for an apron and oven glove set that I wanted to gift to a friend. Lack of understanding Japanese is usually no barrier to sewing from Japanese patterns and this magazine is exactly the same with excellent diagrams.


I cut the apron from the back of the shirt, utilising the shirt yoke as a detail for the top of the apron. I adapted the pattern by using less shirt fabric than the pattern suggested because I didn't want the apron to wrap around so much.


My clever daughter came up with the simple idea of adding a button to the apron to hold the matching oven gloves as she thought it would be easier to find the oven gloves when they were needed!


When looking for a ribbon for the hanging loop, I found a perfectly coordinating (more like camouflaged) ribbon from Jane Means - the beautiful Whitby Striped Ribbon . It picks up all the colours in the paisley fabric - a design from Portabellopixie.

Perhaps I should have titled this post 'Spot the Ribbon'!!


Oven gloves always seemed badly designed and uncomfortable to use. I thought a lot about the design and having sewn the mitten pattern in the Oliver + S book 'Little Things to Sew' I decided to adapt it to create a thumb section for these double oven gloves.


The two major changes involved in using the Oliver+S pattern were lengthening the thumb portion of the pattern and adding a lining. Because of the thumb design, there is only a small amount of padding/wadding needed in the palm section of the pattern.

Adding binding helps the glove come together easily.


These oven gloves turned out very well. I could do with one of these myself and the only improvement I can think of is to move the thumb section more towards the centre so that it can fit both the right or left hand easily.

I'm not sure if a bottle of wine would have been more appreciated as a house-warming gift, but my friend seemed delighted with the set.


Pin It Now!  

Thursday, June 30, 2016

Teacher Gifts 2016 Edition with Sew4Home Patterns

For the last few years I have sewn gifts for teachers ...... purely for selfish reasons - on a balance I would prefer to spend my time deciding between fabrics rather than deciding between chocolates or mugs!!


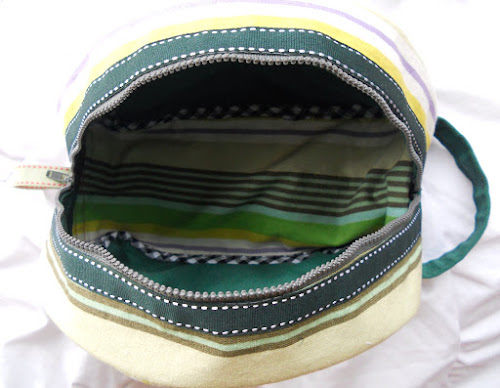
When I need sewing patterns for gifts, one of my favourite sites is sew4home.com. The picture for the Airstream Travel Bag turned up in an e-mail from them very recently and it seemed like the perfect teacher gift. It's particularly suitable for my son's teacher who has told the class about some of her trips to Dubai & America.

My fabric and ribbon choices are very different to the original, and I made some alterations to the pattern.


Firstly I added a flower brooch to the outside. This brooch is a pattern I have been testing and proof-reading for an English translation 'Sew Snappy' of a Dutch sewing pattern book 'Zo Geknipt' which will be launched in Oct 2016.


I omitted the piping from the pattern, which if you have time, is a good addition as it helps provide structure to the bag. Instead, I topstitched the inside binding to the outer curves, with stitching on the outside and this worked perfectly.


The third main change was to fully line the inside. The pattern indicates that the base and zipper portion should only be lined, but it is very straightforward to cut extra front and back pieces and then bind them inside.


The ribbons are stitched on the fabric as indicated in the instructions. These are two different stitched ribbons from Jane Means.


My daughter had 3 teachers this year and I wanted a pattern for their gifts that would be faster to sew. Her year had two teachers who were job-sharing and then another who just did maths with her class. Interestingly this worked very well, better than what could be imagined. The pattern I chose is also from sew4home.com.


The Roll-up Make-up Brush pattern is one I have used a few times before. Because it is so easy to sew, you can have fun with fabric and ribbon selections.


Most of the fabric, binding and ribbons are from my stash. The outer corduroy is from a European fabric company Stenzo. The bindings are Japanese from superbuzzy.com (a shop with all things Japanese that I wish I had shares in!) and the 'chocolate and turquoise' spotted ribbon is from Jane Means.


The top inner fabric is a laminated cotton 'Parson Gray' and the quilted cotton pockets is from Patty Young.


I can't describe fully how easy this gift is, to sew. The most time-consuming part is sewing the lines for the pockets.


Another version of the same pattern, this time with a flower brooch ( I enthusiastically sewed a few of these brooches, in my testing of the Sew Snappy pattern!)


All from my stash, the outer fabric is also a Patty Young fabric, the binding is Liberty of London and the striped ribbon is Jane Means


The inside fabrics are an oilcloth bought locally and the quilting cotton pocket fabric is Heather Bailey.


I would sew these for all the teachers every year if it was possible, but the children sometimes have teachers for more than one year. Maybe if I passed them off or label them as pen holders or pencil holders or cutlery holders instead of Make-up Brush holders, it might work!!!


Pin It Now!  

Friday, April 29, 2016

A Ribbon-trimmed Fifi Camisole/Slip

Last summer Sew Crafty Online held a Facebook competition with a huge prize package. I couldn't believe that I won and was speechless when the incredibly generous prize arrived in the post. All of Tilly and the Buttons sewing patterns, with fabric, a carrier bag and a neat measuring tape were included.


It really is about time I sewed something from that wonderful parcel...


I picked the Fifi camisole pattern (extending the length), some beautiful AnnaMarie Horner voile fabric (from my stash), soft blue denim and sage gingham ribbons from Jane Means ..... et voilà!


This pattern was a very pleasant surprise - excellent & detailed instructions, easy to sew, neat finishing techniques, bias-cut and gently fitted shape. I hadn't expected these details from Tilly's patterns. My perception (inaccurate) was that her patterns were basic and mostly unfitted/loose as some of the earlier ones were.


I both simplified and complicated the sewing process. Using ribbons made it easier to create the straps, but making them adjustable needed a little more brainpower! I attached ribbon loops at the back and threaded the ribbons through. This was an easy alteration to make, and would be very useful if making the Fifi pattern as a gift with nobody available for fitting.


A soft ribbon like this denim ribbon is recommended as I was able to press it into shape, to conform to the curves of the pattern. Good pressing technique is crucial to make ribbons work for this pattern, and it is worthwhile for the time it saves in creating bias strips.


Not wanting to lose length at the hem, I sewed a tiny seam covered with gingham ribbon hem to preserve as much length as possible.

It was necessary to get very creative when I realised I was short a few cm of ribbon for the hem. I turned to another favourite ribbon company of mine, Farbenmix and added a woven patch and a short piece of one of their fun woven ribbons to cover the gap.


The beautifully neat, inside finishing details are, very impressively, all included in the pattern instructions. Usually I would have to figure out how to include these details myself.


Adding a ribbon to the hem is not included in the pattern instructions, but gives a little extra weight to the hem and also finishes it neatly - as seen from the inside.


All the inside seams are French-seamed and the inside back view shows how well the pattern is designed and styled for a closer fit at the back.


I love this pattern and have a bias-cut, ivory bamboo silk version with gingham bias trim and straps cut and ready to sew.


Pin It Now!  

Monday, March 28, 2016

A 'Drapey' Japanese Bubble Dress

When I read about Japanese Pattern Sewalongs there is often a related increase in my sewing, and it was no different when Celina from petitapetitfamily.com and Mie from sewinglikemad.com wrote about their year long sewjapan series back in January.

This is the Japanese pattern book I chose as the dress on the cover is one of my favourites and sewn (& blogged) many times - a sweet version in ladybird corduroy & a pair of bubble dresses for twins.
This time I chose a drapey, pre-pleated fabric from my local fabric shop, though I had doubts if it would hold the 'bubble' effect of the fabric.

When it was sewn up, the fabric gave an a-line shape to the dress. My daughter who had wanted a more fitted dress was happier with this.
This bubble dress is easy to sew, and the Japanese instructions are easy to follow because of the detailed diagrams. My one issue with this pattern is the joining of the lining and the outer fabric which leaves an exposed seam.
As usual, I prefer a clean finish with all seams hidden, something that is particularly important for children's clothes.
For this version I cut the back pattern piece in two, rather than placing it on the fabric fold. (I listed the sewing instruction steps in this post). This allows the dress hem to be pulled out through the back seam and sewn so that it is hidden when the dress is finished . I then sewed an exposed zip and attached the lining at the same time to finish the dress.
The finish is so clean that the dress could almost be worn inside out.
The 'bubble' effect allows for the imagination of an active 9 year old!
We felt the solid colour of the fabric needed something else, so settled on adding ribbons to one of the shoulder seams. We decided that this brown stitched ribbon from janemeans.com would work. These can be left untied or tied in bows. Interestingly, after this was sewn, Burdastyle included a girls dress pattern in the March magazine which had wide ribbon on both shoulders!

Pin It Now!  

Monday, February 29, 2016

How to Sew a Notebook Cover with Ribbon Bookmarks

Notebook covers are one of the most useful and easily personalised gift ideas. I have sewn them before for teachers gifts.


Fabric can be chosen depending on a recipients hobbies, work & interests. When my animal-loving daughter wanted a cover for her homework journal this year, she was thrilled with cats (seen here in an Instagram picture).


For this tutorial I chose a colourful laminated cotton fabric for a recipe journal into which I've been writing our new favourite gluten-free recipes.


The difficulty in writing this tutorial is the huge variety of book/journal sizes, so it is written to show you how to sew a fabric cover for any size of notebook. My favourite part of sewing these covers is being able to add bookmarks and it is an easy way to use up shorter lengths of ribbons.


Firstly chose your fabric:

  • Outer fabric (medium weight cotton, quilting cotton, laminated fabric, upholstery fabric,
  • Lining fabric (this can be a lighter fabric & it won't be seen when the cover is in use)
  • Pocket fabric (medium weight cotton, laminated cotton, interfaced light cotton)
  • Interfacing (medium, the cover will look & function better if it has some structure)
  • Ribbons for bookmarks (use up short lengths of ribbon I chose a selection striped and spotty ribbons from janemeans)
  • Elastic to wrap around the book for closure


Secondly measure the book/notebook/journal that you want to cover.

The 3 main measurements are:
  1. Height (from top to bottom and add 6cm to this - 6cm includes 2 x 1.5 seam allowances and .5 for turning fabric and .5 so cover is a little bigger than the book/journal)
  2. Width (from the edge of the front to the edge of the back. It is important to take this measurement when the book is closed to ensure the cover fits. Add 6cm to this measurement for above reasons.
  3. Front width only (And add half front width to full front width measurement - this is for the inside pocket and elastic)
Thirdly cut out fabric pieces. You may wish to create pattern pieces first with the measurements you've taken and the following directions:
  • Cut 1 x Outer Fabric (Use Height & Width measurements with 6cm added as above).
  • Cut 1 x Inner/Lining fabric (Exactly the same size as Outer Fabric piece).
  • Cut 1 or 2 Interfacing pieces For the Outer Fabric and/or Inner Fabric depending on the weight of your fabric (same size as Outer Fabric above).
  • Cut 2 x pocket fabric (Using Front Width Measurment above with half added for width of pocket and add 6cm, use height of Outer fabric as above. These pieces will be folded in half to form the pockets).
  • Cut elastic (double the Front Width measurement above & add 6cm, may need less if your elastic is very stretchy).
  • Cut a selection of ribbon lengths (eg 1 for a book/novel cover, 2-3 for a journal cover, 4+ for a recipe journal) 7cm longer than the Height of the book/journal.


Fourthly follow instructions and sew the cover:

  1. Add interfacing to the Outer Fabric and depending on fabric weight, to the pocket fabric and the Inner Fabric also.
  2. Fold the pocket pieces in half lengthwise and place on the Inner Fabric as in the picture, baste or pin together

  3. Place the ribbons in the top centre of the Inner Fabric and baste in place (sew with a long stitch)
  4. Sew the two ends of folded elastic to centre front edge of Outer Fabric.

  5. With right sides together place the Outer Fabric on top of the Inner Fabric (and pockets and ribbons). Ensure the ribbons and elastic are carefully tucked inside so they won't be caught in the stitching. Take your time with this step to ensure the tops of the Outer and Inner fabrics are put together and that the fronts also are placed together.

  6. Pin or baste inside the seam allowance all around, leaving an opening for turning. (You can turn through the cover at this stage, especially if you are unsure that pieces are correctly placed from Step 5).
  7. Sew all around using a 1.5cm seam allowance, and leaving a 7cm opening for turning. You may wish to reinforce the corners with an extra line of stitching.
  8. Trim the edges of the fabric closely and carefully, and cut across the corners.
  9. Turn the cover right way around by slowly and carefully pushing the cover through the opening.
  10. Carefully push through the corners, flatten out the cover and press.
  11. Hand stitch or top sew the opening closed.

  12. Insert book/journal cover into the pocket pieces and enjoy!


Pin It Now!