Showing posts with label fabric designers. Show all posts

Thursday, June 30, 2016

Teacher Gifts 2016 Edition with Sew4Home Patterns

For the last few years I have sewn gifts for teachers ...... purely for selfish reasons - on a balance I would prefer to spend my time deciding between fabrics rather than deciding between chocolates or mugs!!


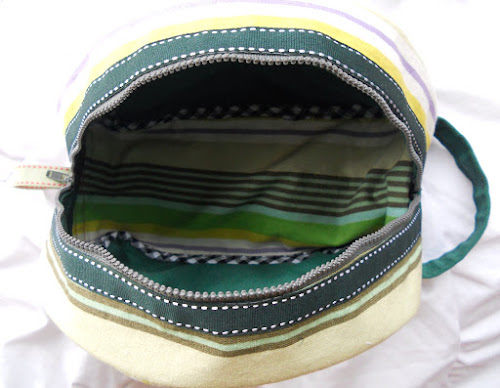
When I need sewing patterns for gifts, one of my favourite sites is sew4home.com. The picture for the Airstream Travel Bag turned up in an e-mail from them very recently and it seemed like the perfect teacher gift. It's particularly suitable for my son's teacher who has told the class about some of her trips to Dubai & America.

My fabric and ribbon choices are very different to the original, and I made some alterations to the pattern.


Firstly I added a flower brooch to the outside. This brooch is a pattern I have been testing and proof-reading for an English translation 'Sew Snappy' of a Dutch sewing pattern book 'Zo Geknipt' which will be launched in Oct 2016.


I omitted the piping from the pattern, which if you have time, is a good addition as it helps provide structure to the bag. Instead, I topstitched the inside binding to the outer curves, with stitching on the outside and this worked perfectly.


The third main change was to fully line the inside. The pattern indicates that the base and zipper portion should only be lined, but it is very straightforward to cut extra front and back pieces and then bind them inside.


The ribbons are stitched on the fabric as indicated in the instructions. These are two different stitched ribbons from Jane Means.


My daughter had 3 teachers this year and I wanted a pattern for their gifts that would be faster to sew. Her year had two teachers who were job-sharing and then another who just did maths with her class. Interestingly this worked very well, better than what could be imagined. The pattern I chose is also from sew4home.com.


The Roll-up Make-up Brush pattern is one I have used a few times before. Because it is so easy to sew, you can have fun with fabric and ribbon selections.


Most of the fabric, binding and ribbons are from my stash. The outer corduroy is from a European fabric company Stenzo. The bindings are Japanese from superbuzzy.com (a shop with all things Japanese that I wish I had shares in!) and the 'chocolate and turquoise' spotted ribbon is from Jane Means.


The top inner fabric is a laminated cotton 'Parson Gray' and the quilted cotton pockets is from Patty Young.


I can't describe fully how easy this gift is, to sew. The most time-consuming part is sewing the lines for the pockets.


Another version of the same pattern, this time with a flower brooch ( I enthusiastically sewed a few of these brooches, in my testing of the Sew Snappy pattern!)


All from my stash, the outer fabric is also a Patty Young fabric, the binding is Liberty of London and the striped ribbon is Jane Means


The inside fabrics are an oilcloth bought locally and the quilting cotton pocket fabric is Heather Bailey.


I would sew these for all the teachers every year if it was possible, but the children sometimes have teachers for more than one year. Maybe if I passed them off or label them as pen holders or pencil holders or cutlery holders instead of Make-up Brush holders, it might work!!!


Pin It Now!  

Saturday, September 14, 2013

Sewing Aprons with Ribbon Straps ...

... and links to Free Apron Patterns


Having sewn very little over the summer holidays, I decided on some easy sewing to get me motivated again. As a gift for a couple who got engaged, I thought aprons might be appreciated. There are lots of apron sewing patterns available, so I chose two, the Emmaline Apron from Sew Liberated and a free apron pattern from a collection on the Internet.


The Emmaline Apron was the more difficult to sew of the two aprons, mostly because I changed the pattern to include ribbons instead of making straps. This might not have been the best choice for a reversible apron, as I had to use a double layer of ribbon, but I think it worked.


The skirt portion of the apron involves sewing the 2 layers of fabric wrong sides together, then turning the right sides out.

On the other hand, the two fabric layers of the top or bodice portion are gathered and sewn with the right sides facing out. The ribbon is then sewn around all the raw edges on both sides for a neat finish. I chose a few different spotty ribbons from janemeans to complement the colours of the stripes and flowers.


I love that it's reversible, and the floral Alexander Henry print is a perfect foil to the stripes on the other side. Having sewn a shark shirt for my husband for last Father's Day, I'm a very recent convert to these great fabric prints.


The Emmaline apron pattern is one of the most unusual apron designs I have seen. As utility items, aprons can generally be shapeless and are simply created to cover garments. This apron has an empire waistline, so the straps tie a little higher than the waist. The darts in the skirt combined with the gathers in the bodice create a very 'shapely' apron (as seen in the pattern pictures), that begs to be worn for eating as well as cooking!


The second apron is from an excellent collection of free apron patterns on the Internet. The specific pattern I adapted came from a vintage pattern e-book (page 6). Men, those that I know at least, tend to not use aprons much, so choosing camouflage fabric was my way of hoping it would be worn!

My efforts at taking pictures of it were comical. I chose the garden so I would have space to open out the aprons, totally forgetting about the camoflage fabric!


This apron was surprisingly easy to sew considering I thought there would be difficulties with the seams on the curved sides due to stretching. Folding in the raw edges twice, 0.5cm and then 1cm and pressing them made the sewing very quick. I also used ribbons on this apron, but chose striped janemeans ribbons. The ribbons were pushed under the last 1cm fold, then brought around to the front and sewn. All the corners are mitred for a neater finish.


The ribbon for the neck straps is strengthened by sewing two ribbons together. To make the neck straps adjustable, I added a loop with D-rings which will hopefully allow for a better fit.


And a final picture showing how effective the camouflage fabric actually is!


It might a very interesting experience to wear this camoflage apron for the garden barbecue!


Pin It Now!  

Sunday, June 30, 2013

Sewing Teacher Gifts

For the last few years I have sewn gifts for the children's teachers. I've tried to make useful items like tote bags, and make-up/pen rolls. Perhaps it would be a lot easier if I made the same thing every year, so I wouldn't have to rack my brain for inspiration!!!

This year the inspiration came from my daughters teacher who, at the parent-teacher meeting, was using a plain copybook where she had recorded notes about the students. I thought that a brightly coloured cover with ribbon bookmarks would be easier to see on her desk and more cheerful than the copy cover.


I had a look around the Internet for a pattern, but none were exactly what I wanted. I measured a standard copybook and drew up a pattern.


The pattern involves 2 large rectangles for the front and inside, 2 smaller rectangles for the cover holders, 1 rectangle for the pen holders, elastic and ribbon.

The front, inside and 'cover holders' are interfaced, but the pen holder on the front is just a double layer of fabric.


My favourite part are the bookmark ribbons. I used green and purple narrow stitched ribbons from JaneMeans for the blue/green cover, and red/cream vintage stitched ribbon for the red/blue cover. They just matched perfectly!


To keep the covers closed, I considered Velcro. It works very well, but can get raggy from a lot of use. So I went with elastic, and luckily I had some coloured elastic to chose from. White or black elastic would not have looked as good!


Most of the fabrics are Riley Blake designs from The Fabric Loft UK, with the blue floral from my stash. Ribbons are from janemeans, the purple stretch trim is from Abakhan Fabrics and the green elastic from my stash.


The biggest lesson I learned was to make the pattern pieces about 2.5cm/1inch bigger all around than the copy/notebook measurements, and sew with seam of 1cm. This allows for the depth of the copybook as well as the topstitching.

The first attempt wouldn't fit a copybook! But it was very helpful to have a practice version.


Pin It Now!  

Wednesday, June 27, 2012

Colourful Teacher Gifts


Last year, for teacher gifts, I made the Mother & Daughter Totes from Oliver+S which is one of their free patterns. I'm not sure why I didn't make them again this year, but this pattern on Sew4home caught my eye.

It is a Roll-up Makeup Brush Case, made with a wipe-clean lining. Most of these type of patterns have square corners, but I liked the curved corners and the Sew4home website gives a template for this.


It's a lovely easy pattern and what took me the most time was joining the bias binding on the outside.

This is the inside of one of the rolls with some mini brushes inside


and opened out to get the full effect.
I used a very varied mixture of fabric from Stenzo, Hilco, Moda, Farbenmix, Patty Young and laminated cottons from Amy Butler and Anna Maria Horner.


I've had a lot of fun making these, matching and mis-matching colours of fabrics, bias and ribbons. I have 2 more to make and that will be the end of my assembly-line sewing for a while.


Pin It Now!  

Sunday, July 31, 2011

Overload of dresses

Before all the pics of the recent dresses I made, I want to show a picture from a website I came across recently. This company is selling beautiful dresses, but on a second look, it's a Feliz! sewing pattern made up. Can you imagine having the cheek to use that and market it in such a large scale. Not only that, but the Laguna skirt from Studio Tantrum and Patty Youngs Kyoko and Sydney are also on the site, the latter two are even made up in Patty Young fabric! Oh, and to even top that, they call their Feliz 'Patty'. All these patterns are copyrighted, most of them I have, so seeing a company being this blatant is unpleasant and must be so upsetting for the designers.


Back to my own sewing ..........

I'm almost finished the Lonsdale Dress by Sewaholic. I was going to shorten it quite a bit but after seeing the pictures, I think I'll just sew a narrow hem.


The two dresses below are for my nieces 7th birthday. I wanted some pictures of them, so my daughter had some fun trying them on, odd socks and all!
The orange dress (my niece specifically wanted an orange dress - this is the girl who wanted the green dress at Christmas) is made from a sewing magazine Sue & Blu #3080, 2006 with Anna Maria Horner 'Innocent Crush' fabric. I sized up the dress to size 8 to make sure it would be long enough. This was the second of the 2 birthday dresses I made and I wanted something easy to sew where I wouldn't be forever finishing seams. So it's a bubble dress.


Very straightforward to sew, all seams hidden and no zip, just 2 buttonholes, with lovely patterned shell buttons from my stash.


I even made belt loops, which are a bit twisted, but much improved on my first effort. There is no belt in the pattern, but the dress looked too wide for my niece, so I added it a simple ribbon belt which worked perfectly.


I lined it in white rather than any other colour because it seemed to brighten the orange on the outside.

Of course, the requisite bag, made from the Japanese pattern I've used many times before.


Another action shot!


The second dress (which I sewed first) is a combination of 2 patterns, the Analise from Portabellopixie for the bodice and Studio Tantrum/Farbenmix Redondo for the skirt. I had decided for quite a while that the skirt would be the Redondo, but it took me ages to settle on a bodice pattern. I make these dresses without my niece's measurements, so I'm always trying to make sure they're adjustable in some way. The elastic and shoulder straps of the Analise were ideal.


The Analise is easy to sew. I made 2 changes to the pattern - adding 4 more rows of elastic to the back, which means the back of the dress lies flat even with the straps tied which is not the case in the pattern pictures. The other change was to cut the underarms higher because these seemed to be too low, also in the pattern pictures.


My fanatical seam finishing continues ..... I sewed flat-felled seams on every curved seam to neaten the inside, hence, my choice of an easy bubble dress after.
The flowery fabric is Heather Bailey and the purple is Kafe Fassett, and I bought all these from Quilt home.

The bag pattern is a drawstring bag and was adapted from a picture I saw in the 2009 Sue & Blu magazine, because I wanted it ruffled like the dress.


Finally, the Redondo part of the dress. What a fun pattern! I added an extra panel so I could have an even mix of colours, this meant I had to do some calculations on the pattern pieces to make sure they would fit to the bodice.
The pattern pieces are like a puzzle, and when I had the fabric cut out, I had no idea how I would make the curved seams fit together, really NO idea, even after reading the translation of the pattern instructions.


Once I realised that the inner circle of one piece was only sewn halfway down the outer circle of  another piece, it started to come together. Two other tricks helped: sewing the curved seams with the fabric to the right (rather than the usual left) of the sewing machine needle and foot made these curved seams dramatically easier to sew; and tapering to zero seam allowance at the hem made hemming the skirt much easier.

On the day of my niece's 7th birthday, she opened the bag with the dresses, pulled out the orange one and put it on - a happy Birthday girl! and a happy sewist!!! Pin It Now!  

Thursday, April 1, 2010

Present for my godchild ... 2

I know that my godchild likes unicorns, so I also made her this skirt and top.


The skirt is a Burda magazine pattern (1/09#138), which I made a little wider ( for more 'twirl') and also added a casing at the side so the top layer could be tied up.


The fabric is 'Far Far Away' double gauze from Heather Ross, which is very soft but I find it is a bit too drapey/clingy/wrinkly - though I think it works ok in this skirt.


I made the top as an after thought, and it is not the best finished piece I ever made. (Burda 6/09#140). I had to recut the neckline binding as the pattern piece was too short, and the neck has 6 little buttons - so that meant trying to fit in 6 tiny buttonholes.

The applique is a first effort, and I only noticed that the unicorn has its head to the ground when I had it completed - oh well!


She should enjoy wearing this (fingers crossed!).
Pin It Now!  

Thursday, October 15, 2009

Catching up!!


Having bought Heather Ross fabric early in the year, I have been looking at it for quite a few months, wanting to make the duvet cover but just not getting round to it.
My daughter moved into a bed early May and I had great plans to make a cover.........


...... 5 months later ta daaaaaa! It was really quick to sew....... eventually.


What took the longest was measuring all the bits, the duvet and the fabric.


I love how it looks and more importantly my daughter loves her "Princess and pea" with all her 'buddies' Pin It Now!  

Thursday, October 1, 2009

A Prize that keeps on Giving!

Having named a new pattern for the designer Patty Young (a great prize in itself), I received an extremely generous prize from her in the post.


So I got to work. To increase the fun from the prize, I didn't use the fabric and pattern together.


Firstly I made Kyoko using a solid babycord and I lined it with gingham as well as making my own bias binding - this was all very easy which has a lot to do with the clear instructions in the pattern.
The obi belt is so great looking and was also easy to make.
Then I went looking for some dress patterns and found one I had been thinking about in a Japanese book 'My Favourite Dress'. I made a few changes to this pattern - buttons instead of a zip, different fabric in the pleats, lined the whole top of the dress.
Attaching the pleats was the most time-consuming part, but it turned out very pretty. I adore this Mod Blooms cord - it is so striking.
I wasn't sure about the pockets, but added them anyway and sewed some 'mini dots Kiwi' ribbon on top.
Well, this was, and is, such a great prize, from a very talented and extremely generous designer.
Pin It Now!