Showing posts with label Japanese pattern. Show all posts

Wednesday, August 31, 2016

Upcycled Shirt/Apron and an Ergonomic Oven Glove!

Having large selection of Japanese Pattern Books means that there are quite a few that I haven't sewn from.


'Cotton Friend' is a more unusual Japanese Pattern Book in that it resembles a magazine rather than book format. I would have loved to subscribe to a Japanese pattern magazine like this, but I can safely say that won't happen unless I get around to doing a Japanese language course!


Sometimes, patterns stand out & are put on the mental, never-ending to-do list. This apron pattern from 2010 is one that I always thought was a clever use of fabric. It came to mind when I found the perfect shirt fabric for an apron and oven glove set that I wanted to gift to a friend. Lack of understanding Japanese is usually no barrier to sewing from Japanese patterns and this magazine is exactly the same with excellent diagrams.


I cut the apron from the back of the shirt, utilising the shirt yoke as a detail for the top of the apron. I adapted the pattern by using less shirt fabric than the pattern suggested because I didn't want the apron to wrap around so much.


My clever daughter came up with the simple idea of adding a button to the apron to hold the matching oven gloves as she thought it would be easier to find the oven gloves when they were needed!


When looking for a ribbon for the hanging loop, I found a perfectly coordinating (more like camouflaged) ribbon from Jane Means - the beautiful Whitby Striped Ribbon . It picks up all the colours in the paisley fabric - a design from Portabellopixie.

Perhaps I should have titled this post 'Spot the Ribbon'!!


Oven gloves always seemed badly designed and uncomfortable to use. I thought a lot about the design and having sewn the mitten pattern in the Oliver + S book 'Little Things to Sew' I decided to adapt it to create a thumb section for these double oven gloves.


The two major changes involved in using the Oliver+S pattern were lengthening the thumb portion of the pattern and adding a lining. Because of the thumb design, there is only a small amount of padding/wadding needed in the palm section of the pattern.

Adding binding helps the glove come together easily.


These oven gloves turned out very well. I could do with one of these myself and the only improvement I can think of is to move the thumb section more towards the centre so that it can fit both the right or left hand easily.

I'm not sure if a bottle of wine would have been more appreciated as a house-warming gift, but my friend seemed delighted with the set.


Pin It Now!  

Monday, March 28, 2016

A 'Drapey' Japanese Bubble Dress

When I read about Japanese Pattern Sewalongs there is often a related increase in my sewing, and it was no different when Celina from petitapetitfamily.com and Mie from sewinglikemad.com wrote about their year long sewjapan series back in January.

This is the Japanese pattern book I chose as the dress on the cover is one of my favourites and sewn (& blogged) many times - a sweet version in ladybird corduroy & a pair of bubble dresses for twins.
This time I chose a drapey, pre-pleated fabric from my local fabric shop, though I had doubts if it would hold the 'bubble' effect of the fabric.

When it was sewn up, the fabric gave an a-line shape to the dress. My daughter who had wanted a more fitted dress was happier with this.
This bubble dress is easy to sew, and the Japanese instructions are easy to follow because of the detailed diagrams. My one issue with this pattern is the joining of the lining and the outer fabric which leaves an exposed seam.
As usual, I prefer a clean finish with all seams hidden, something that is particularly important for children's clothes.
For this version I cut the back pattern piece in two, rather than placing it on the fabric fold. (I listed the sewing instruction steps in this post). This allows the dress hem to be pulled out through the back seam and sewn so that it is hidden when the dress is finished . I then sewed an exposed zip and attached the lining at the same time to finish the dress.
The finish is so clean that the dress could almost be worn inside out.
The 'bubble' effect allows for the imagination of an active 9 year old!
We felt the solid colour of the fabric needed something else, so settled on adding ribbons to one of the shoulder seams. We decided that this brown stitched ribbon from janemeans.com would work. These can be left untied or tied in bows. Interestingly, after this was sewn, Burdastyle included a girls dress pattern in the March magazine which had wide ribbon on both shoulders!

Pin It Now!  

Monday, August 31, 2015

From Refashioned Men's Shirts to Children's Clothes


Sewing during summer holidays needs to be in short bursts, so refashioning fits in with what little sewing time I have. Previous shirt refashions that I've blogged are a dress & waistcoat, a sailor dress, a denim dress, waistcoat and a knit top & skirt, all children's clothes.


The inspiration for these recent remakes is The Refashioner 2015 series by Portia at the Makery blog.


I started with this shirt as I loved the fabric. This is the only shirt I've upcycled for an adult to wear!


The pattern is 'pattern k' a lovely fitted blouse from Sato Watanabe's Basic Black by Tuttle Books. I previously sewed this asymmetrical top from the book.


I removed the collar, and stitched the collar stand, so it looks like the stand-up collar in the book. I cut the sleeves off at the armhole, shortened them, reshaped the armholes and the sides and added front and back darts for shaping. It still needs hemming, but is a now a perfect shirt for Autumn.


Then I got a bit more creative. It seemed that there should be enough fabric in a shirt to sew a boys pyjamas, but I needed to find a way of avoiding buttons, so it would be comfortable to wear.


This is what worked - After cutting off the sleeves, I folded the shirt in half, half the front and half the back and turned it upside down. The pattern I used was the Oliver&S Bedtime Story Pajamas / Pyjamas pattern because it has a one-piece leg pattern. The pattern fit easily on the shirt fabric.


Cutting a shirt this way would also provide plenty fabric even for some adult-sized shorts.


The waistband was cut from the yoke, though not on a fold, so it had to be pieced.


The legs were cut from the sleeves without I picking the seam and using the lower part of the leg pattern as a guide only, to get the length correct.


I sewed the pyjamas, mostly following the pattern instructions.

The leg had to be pieced together and I didn't want that inside seam to be uncomfortable. The simple solution was to sew the seam on the outside and cover it with ribbon. The ribbon is a vintage blue stitched ribbon from janemeans, which was a perfect match for the shirt fabric.

Not a perfect pair of pyjamas by any means, but not bad for zero fabric cost and a quick sew. There's also a 10 yr old boy who loves that these were sewn especially for him!


Pin It Now!  

Monday, July 27, 2015

A Japanese Pattern Book for Beginners - Sewing For Your Girls


Sewing For Your Girls by Yoshiko Tsukiori is much more suitable for beginners than most other Japanese books that I've sewn from. It was originally published in 2011 and is one of the recent English translations by Tuttle Books.


It provides 8 basic patterns for dresses, tops and shorts with 7 variations. All patterns, except one (which is easily drafted) are included as full-sized pattern pieces in a pocket inside the back cover. The patterns are for girls, though the shorts and overalls could be sewn for boys, and the sizing is based on height - approximately equivalent to age 2 to 8 years.


This Japanese pattern book would be perfect for a beginner at sewing. As well as pictures of the clothes and instructions for all of the patterns, most of the book is devoted to photo tutorials on how to sew.


Many Japanese Pattern books are not generally suitable for beginners. They rely on detailed diagrams to illustrate sewing instructions, so include much shorter descriptions of sewing steps. The other book of adult-sized patterns by this author that I sewed from, would not be as useful for anyone beginning sewing.


The three photo-tutorial sections are

  1. Basics of Dressmaking,
  2. A detailed Step-by-Step to make one of the dress patterns and
  3. Basic Sewing Techniques.


1. The Basics of Dressmaking is very well-presented. It includes descriptions of the fabrics used in the book and emphasises the importance of prewashing. Basic equipment is described and detailed pictures on Tracing a Pattern, Cutting out Fabric, Marking Symbols and Using a Sewing Machine are also shown.

2. There is a fully illustrated, complete photo-tutorial on how to sew the first pattern in the book and it includes techniques like creating bias tape, reinforcing pocket edges, and neatly finishing the armhole and shoulder frill. Every one of the numbered steps is pictured in detail.


3. There are 33 pages of tutorials on Basic Techniques which thoroughly illustrate all the steps needed for sewing techniques to sew the patterns in the book. Everything from facings, collars, hand sewing, plackets, invisible zip, pockets and shirring are covered.


I sewed two dresses from this book. The first was a sailor dress from Applied pattern 7 where I repurposed an old shirt for the fabric.


The second dress I sewed was Basic Pattern 5. This is the only dress where a pattern has to be drafted. But it is very straightforward as it utilises 2 rectangles which are based on the child's measurement.

It is a number of years since I've used shirring and it's as easy as I remember. There is a photo tutorial on how to shirr fabric which a beginner would find very helpful.


I used ribbon for the straps as I had a perfectly matching vintage stitched janemeans ribbon, but the steps needed to create straps are also given in the book and are easy to follow.


This dress was a very easy and quick make and would be a very convenient way of using a half-metre of fabric from your stash. Before I shirred the dress, my daughter thought the fabric looked like a curtain, but that didn't bother her too much once she tried it on!


(Tuttle Publishing sent me this pattern book free. All opinions are my own. I have been happily sewing from Japanese language pattern books since 2009)


Pin It Now!  

Thursday, May 28, 2015

A Girl's Dress with Ribbon Sailor Collar

Sailor dress patterns have been on my 'to sew' list for my daughter for quite a while. Mostly I've been hoping that they would become a fashion trend. After waiting years for this trend to happen and seeing this 2014 Oscar de la Renta dress, it seems that there is a 2015 nautical Spring/Summer trend which is extending into Autumn/Winter. These mentions are good enought for me!

The pattern I used for the dress is from a newly released English translation of Japanese sewing patterns from Tuttle Books. 'Sewing for your Girls'. I intended sewing this pattern for a review of the book, but took a few too many shortcuts and didn't follow the pattern exactly. I also sewed a second dress and will review the book in my next post.


The pattern pieces were cut from a second-hand man's shirt, and I included the centre front button bands from the shirt as the dress opening. This is very different from what the pattern suggests, but made it so much quicker to sew the dress....... and I didn't have to sew buttons or buttonholes!


The sailor collar pattern pieces (undercollar and main collar pieces) were cut from the sleeves.


The details are my favourite parts of this dress. Sailor stripes are usually created by sewing rows of a contrasting colour. Any of the striped and stitched ribbons at Jane Means would make an excellent choice for a collar like this. I chose a purple stitched janemeans ribbon which created the illusion of stripes. I mitred the ribbon at the corners for neatness, and used Liberty of London bias binding for the neckline and armholes instead of the facings in the pattern.


My daughter found these pom-poms and appliqué in my stash, so we added them and a purple ric-ric hem to complete the dress.


Pin It Now!  

Thursday, May 14, 2015

She Wears The Pants - A Sewing Pattern Book Review

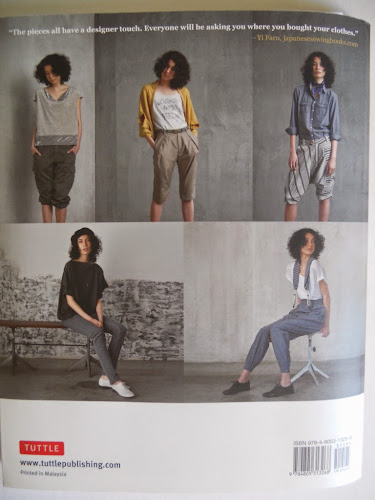
A more unusual Japanese pattern book has just been translated into English and published by Tuttle Books. 'She Wears the Pants' is a take on what has been called boyfriend style clothes.


It was originally published in 2010 with the Japanese title which translated as 'She Has a Mannish Style'. Despite being published 5 years ago, the patterns have a very current look, with a few classics also included.


There are 20 varied patterns in this pattern book, including 7 blouses/tops, 4 jackets/coats/cardigan, 4 trousers/culottes, 2 dresses, one skirt and 2 accessories stole/long collar.


Some of the patterns, like the draped mini dress and the square top, follow the typical loose-fitting style of Japanese patterns. However, more fitted styles such as the tapered trousers and culottes above are also included.


The sizing is in the range from XS to L. XS corresponds approximately to US size 6, and size L corresponds to US size 14. Because the sizes are nested on the pattern sheets, it would be easy to size up one or two sizes while tracing a pattern.

This book also has an excellent centre section with pictures and tips on sewing with different types of fabrics and how to finish seams on different fabrics

As with many Japanese Pattern books, all the patterns are included on pull-out sheets in a pocket inside the back cover and patterns must be traced from these sheets.

Instructions for sewing up each pattern are listed in numbered steps, with numbers linked to those on the corresponding diagrams. Sometimes a particular step is described and illustrated only for an earlier pattern, but usually the page number is given if a step from a different pattern needs to be used.

Seam allowances are not included, but the fabric layout diagrams show the exact allowance that is needed for each pattern piece.


Some of the styles in the book would not suit my shape as I need my clothes to be a little fitted above my waist. Other styles are a little too 'edgy' for my taste. However what I found most impressive about this book was the inclusion of classic shirt and jacket patterns.

The fleece and striped long jackets as well as the dotted blouse are classic styles and include details like welt pockets, bound buttonholes, sleeve plackets and collar and under collar, which are thoroughly illustrated with clear detailed diagrams.


What make me love this book is the diagram on 'bagging a jacket'. This sewing technique is generally difficult to describe in words, and also difficult to demonstrate and photograph with an actual jacket, but this book provides a detailed, numbered line-drawing. I have quite a collection of Japanese language pattern books and English translations, and this is the first I noticed with this type of jacket diagram.


The pattern I had planned on sewing from this book is this draped mini dress, but life got in the way a little, so instead I chose to use part of another pattern.


My son wanted a costume for Cork Comic Expo which was held a few weeks ago in a local shopping centre, Mahon Point. The costume was a black cape and hat for 'V for Vendetta'. I had to draft the hat myself, but used a vintage pattern for the cape. However, the Cape pattern didn't include a collar, so I needed a well-designed curved collar pattern which would stand up well. I found No.18 Dotted Blouse had exactly what I needed and traced the collar and collar stand. The only change I needed to make was to increase the size of the lapels to provide the look that my son wanted.

(Pic source: Facebook Mahon Point)


I think he got the look!


(Tuttle Publishing sent me this pattern book free. All opinions are my own. I have been successfully sewing from Japanese language pattern books since 2009)


Pin It Now!  

Saturday, February 28, 2015

Handmade Clothes for Girls: A Sewing Pattern Book Review

One of my favourite Japanese Sewing Book authors/pattern designers is Yuki Araki. I have 3 of her books in Japanese (one which was translated into French) and previously sewed from 2 of her pattern books here and here.


Recently one of her books 'Sew Sweet: Handmade Clothes for Girls' (that I happened not to have in Japanese) has been translated into English. Tuttle Books sent me a copy to review.


Though I always love the pictures In Japanese pattern books, I usually have to skip straight to the pattern instructions as it is these diagrams and line drawings that I understand, despite the language barrier.


With this book it was a treat to finally be able to read Yuki Araki's words and understand her designing and sewing process. The patterns in the book are interspersed with little personal notes about sewing or her daughters, and being able to read and understand these added immensely to my enjoyment of the book.


Sew Sweet is a sewing pattern book with 22 patterns (as well as extra variations) for dresses, camisoles, blouses, bags, a hat, a jacket, shorts/leggings, skirts, and even two tops for women.


The layout of the book follows that of most Japanese pattern books. The pictures of the designs are at the front and the pattern instructions with clear, detailed diagrams are towards the back. The centre of the book includes general information or 'Sewing Notes' on sizing, tracing patterns, fabric layouts, marking and cutting, as well as sewing tips. There is also a picture tutorial for one of the patterns which includes details on how to construct a strip placket and stand-up collar.


The sizes in this pattern book are approximately from 18months to 6 years. (There's a very useful size chart on the finishedgarment blog which compares sizes across children's patterns, though Japanese patterns are not specifically included)


As part of my review of Sew Sweet, I sewed one of the patterns from the book, pattern 'C' which is a double-layered skirt with a waist casing and a ribbon casing. It is one of two patterns in the book that are not on the pattern sheets, and I was able to cut it out easily by marking the included measurements on the fabric. All the other patterns are easily identifiable on the pattern sheets and need to be traced.


To coordinate with the white/pink spotty fabric, I chose a chocolate and pink ribbon from janemeans. The ribbon casing is not sewn into the waistband on the inside which means the ribbon colour can be easily changed whenever the wearer wishes!

My daughter can't wait for warmer weather so that she can wear this, though it looks like she'll have to wait a few more months.


(Tuttle Publishing sent me this pattern book free. All opinions are my own. I have been happily sewing from Japanese language pattern books since 2009)


Pin It Now!