Showing posts with label sewing for boys. Show all posts

Monday, August 31, 2015

From Refashioned Men's Shirts to Children's Clothes


Sewing during summer holidays needs to be in short bursts, so refashioning fits in with what little sewing time I have. Previous shirt refashions that I've blogged are a dress & waistcoat, a sailor dress, a denim dress, waistcoat and a knit top & skirt, all children's clothes.


The inspiration for these recent remakes is The Refashioner 2015 series by Portia at the Makery blog.


I started with this shirt as I loved the fabric. This is the only shirt I've upcycled for an adult to wear!


The pattern is 'pattern k' a lovely fitted blouse from Sato Watanabe's Basic Black by Tuttle Books. I previously sewed this asymmetrical top from the book.


I removed the collar, and stitched the collar stand, so it looks like the stand-up collar in the book. I cut the sleeves off at the armhole, shortened them, reshaped the armholes and the sides and added front and back darts for shaping. It still needs hemming, but is a now a perfect shirt for Autumn.


Then I got a bit more creative. It seemed that there should be enough fabric in a shirt to sew a boys pyjamas, but I needed to find a way of avoiding buttons, so it would be comfortable to wear.


This is what worked - After cutting off the sleeves, I folded the shirt in half, half the front and half the back and turned it upside down. The pattern I used was the Oliver&S Bedtime Story Pajamas / Pyjamas pattern because it has a one-piece leg pattern. The pattern fit easily on the shirt fabric.


Cutting a shirt this way would also provide plenty fabric even for some adult-sized shorts.


The waistband was cut from the yoke, though not on a fold, so it had to be pieced.


The legs were cut from the sleeves without I picking the seam and using the lower part of the leg pattern as a guide only, to get the length correct.


I sewed the pyjamas, mostly following the pattern instructions.

The leg had to be pieced together and I didn't want that inside seam to be uncomfortable. The simple solution was to sew the seam on the outside and cover it with ribbon. The ribbon is a vintage blue stitched ribbon from janemeans, which was a perfect match for the shirt fabric.

Not a perfect pair of pyjamas by any means, but not bad for zero fabric cost and a quick sew. There's also a 10 yr old boy who loves that these were sewn especially for him!


Pin It Now!  

Thursday, May 14, 2015

She Wears The Pants - A Sewing Pattern Book Review

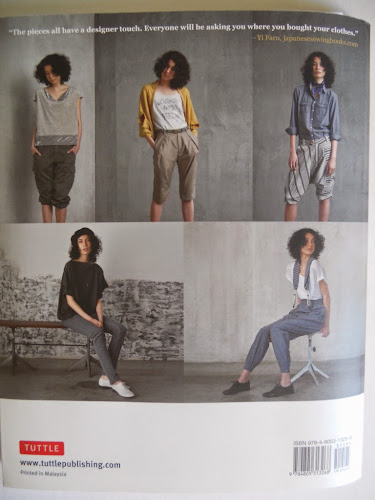
A more unusual Japanese pattern book has just been translated into English and published by Tuttle Books. 'She Wears the Pants' is a take on what has been called boyfriend style clothes.


It was originally published in 2010 with the Japanese title which translated as 'She Has a Mannish Style'. Despite being published 5 years ago, the patterns have a very current look, with a few classics also included.


There are 20 varied patterns in this pattern book, including 7 blouses/tops, 4 jackets/coats/cardigan, 4 trousers/culottes, 2 dresses, one skirt and 2 accessories stole/long collar.


Some of the patterns, like the draped mini dress and the square top, follow the typical loose-fitting style of Japanese patterns. However, more fitted styles such as the tapered trousers and culottes above are also included.


The sizing is in the range from XS to L. XS corresponds approximately to US size 6, and size L corresponds to US size 14. Because the sizes are nested on the pattern sheets, it would be easy to size up one or two sizes while tracing a pattern.

This book also has an excellent centre section with pictures and tips on sewing with different types of fabrics and how to finish seams on different fabrics

As with many Japanese Pattern books, all the patterns are included on pull-out sheets in a pocket inside the back cover and patterns must be traced from these sheets.

Instructions for sewing up each pattern are listed in numbered steps, with numbers linked to those on the corresponding diagrams. Sometimes a particular step is described and illustrated only for an earlier pattern, but usually the page number is given if a step from a different pattern needs to be used.

Seam allowances are not included, but the fabric layout diagrams show the exact allowance that is needed for each pattern piece.


Some of the styles in the book would not suit my shape as I need my clothes to be a little fitted above my waist. Other styles are a little too 'edgy' for my taste. However what I found most impressive about this book was the inclusion of classic shirt and jacket patterns.

The fleece and striped long jackets as well as the dotted blouse are classic styles and include details like welt pockets, bound buttonholes, sleeve plackets and collar and under collar, which are thoroughly illustrated with clear detailed diagrams.


What make me love this book is the diagram on 'bagging a jacket'. This sewing technique is generally difficult to describe in words, and also difficult to demonstrate and photograph with an actual jacket, but this book provides a detailed, numbered line-drawing. I have quite a collection of Japanese language pattern books and English translations, and this is the first I noticed with this type of jacket diagram.


The pattern I had planned on sewing from this book is this draped mini dress, but life got in the way a little, so instead I chose to use part of another pattern.


My son wanted a costume for Cork Comic Expo which was held a few weeks ago in a local shopping centre, Mahon Point. The costume was a black cape and hat for 'V for Vendetta'. I had to draft the hat myself, but used a vintage pattern for the cape. However, the Cape pattern didn't include a collar, so I needed a well-designed curved collar pattern which would stand up well. I found No.18 Dotted Blouse had exactly what I needed and traced the collar and collar stand. The only change I needed to make was to increase the size of the lapels to provide the look that my son wanted.

(Pic source: Facebook Mahon Point)


I think he got the look!


(Tuttle Publishing sent me this pattern book free. All opinions are my own. I have been successfully sewing from Japanese language pattern books since 2009)


Pin It Now!  

Monday, October 28, 2013

Japanese Sewing Patterns for Children - in English!!


It's no secret that I love Japanese Sewing Pattern Books. A quick search through the blog will show up many clothes that I've sewn from Japanese language books.

The popularity of these books meant that it was only a matter of time before English versions would be available. So getting a chance to review two newly published books from Tuttle Books was very exciting!


The first book is from the Happy Homemade series and is called Sew Chic Kids. It is a translation of a Japanese pattern book by the same author, Ruriko Yamada, and it's the first time I've used an English translation of a Japanese sewing book.


It's a cleverly planned and designed book where a number of basic bodice and pants/trousers pattern shapes are transformed into 20 different patterns for boys and girls aged 2 to 8 years. There are 7 patterns for boys including a shirt with a stand-up collar that I really want to sew.

In total, there are 7 dresses, 5 tops/blouses, 2 shirts, 5 pants/trousers/shorts and 1 skirt. Each pattern is identified with a letter of the alphabet, and this is used to find the pattern pieces on the pattern sheets that are included. Seam allowances must be added to the pattern pieces and the book includes information on how to do this, as well as illustrating the seam allowances on the fabric layouts for each pattern.


For anyone who has previously used the Japanese language sewing pattern books, you are in for such a treat!
Now, instead of skipping over the Japanese symbols, just admiring the beautifully taken photographs, and then turning to the diagrams and illustrations, you will have the pleasure of being able to easily read all the important and fun details that give character to a book.


Because I am so familiar with the Japanese versions of these books, it seemed a good idea to sew from this English language version.

I chose the first dress in the book 'a' and used a Liberty of London fabric with a linen solid for the yoke. Each step in the pattern instructions is numbered, with a diagram for each of the steps. This makes following and understanding instructions very straightforward.


The print is very busy, so I changed the application of the armhole binding by applying it to the outside for a pop of colour. The technique to sew the back placket was clearly illustrated so despite not having sewn one in a while, it was easy to sew.


The simple designs of the clothes and patterns in this book hide the varied and complex sewing techniques that are used in their construction. These techniques include the application of bias binding, sewing a placket, sewing pintucks, inserting elastic in a casing, sewing a faux fly, making buttonholes (see picture), and others. All of these techniques are clearly explained using numbered diagrams.
Both inches and centimetres for measurements are used throughout the book, and a chart for children's measurements makes choosing a size easy.


This book would be very useful for a beginner at sewing. It has sections on the basic tools that are needed, sewing machine tips and information on different fabric widths.
There is also incredibly helpful information on matching needle sizes, to thread sizes and to fabric types, which I haven't seen mentioned in many sewing pattern books.

I am sewing a silk chiffon top from the women's version of this book Happy Homemade Sew Chic, and will do a follow-up post on it once the top is finished


Pin It Now!  

Friday, May 31, 2013

Sewing on a Budget - Boys Vest & Father's Day Ties ..

.. & suggestions for selecting sewing pattern sizes


It's been quite a while since I sewed for my boys, and even longer since I sewed a waistcoat. As we had a family occasion to attend, I decided it was time I sewed something dressy for my 8 year old son. This Simplicity 1745 pattern is excellent value as it has both boys and men's sizes, and the mint striped cotton from Abakhan Fabrics was just what I was looking for.

I don't often use sewing patterns from the 'Big 4’ ( Vogue, McCalls, Butterick & Simplicity) as there is so much ease included that they turn out too big. (There's some excellent discussion about this around the Internet at the moment - links here)

However, I liked the look of Simplicity 1745 and I wanted to see if I could work out the sizing.

How to sew the correct pattern size for a child's garment:

  • When selecting a pattern use the 'Finished Measurements' if they are included to make sure the pattern is within the child's size range.
  • Take two sets of measurements - first take the usual body measurements with the tape close to the body, then take a second set holding the tape out a little from the person allowing for ease (room to move - eg. get them to bend & stretch with the tape around them!).
  • Measuring a similar garment that the person wears can also help with estimating the amount of ease that's needed.
  • Compare the second set of measurements to the actual pattern pieces, taking note of/adding on the seam allowances.
  • Select the size lines that are closest to the second set of measurements.
  • For example: my sons second set of measurements meant that I had had to use the Boy's Small size line for his width, but use the Large size line for his height/length.
  • Also take note of the shoulder (base of neck to top of arm) measurement. These patterns tend to have a wide shoulder shape, so I measured his shoulder, added seam allowances, and marked this on the pattern.


I liked how this pattern looked sewn up, though the shoulders were still a little wide. The instructions were clear and easy to follow. The boy's version could probably do without the curve on the back seam and the front darts, especially for a narrow-shaped child. The pattern would be even quicker to sew up if these were omitted.


When searching for buttons on Abakhan, I was delighted to come across these ceramic animal shaped buttons from Injabulo. These were on sale and are a fun addition to children's clothes.


Boys and dinosaurs are practically a given, especially for my 8 year old who knows about things like what dinosaurs lived in the Jurassic age! So I chose a fun dinosaur cotton print for the waistcoat/vest lining. This is a great print and the all the dinosaurs have mirror images which means the shapes could be cut out, sewn right sides together leaving an opening, then turned and stuffed to make little toys.


'Somebody' was very impressed with his dinosaurs! My son loved that I made him this vest and tie with the dinosaur lining and loved how 'cool' he looked.


I couldn't resist sewing the tie to complete 'the look'! I have sewn ties before and because they are cut on the bias, they can be difficult to sew. This tie pattern worked out very well, and I altered the pattern to include lining at the ends for which I fussy cut the dinosaur fabric!

I was so impressed with the tie pattern that I got completely ahead of myself and ........


...... sewed up two ties for Father's Day (for my husband) with fabric from Abakhan that I used in previous projects. The tie with balloons might be a little over-the-top!!! but I quite like the tie with the red lines.

The cost of the fabric and notions for the waistcoat and tie were:

Mint ticking-stripe cotton fabric x 0.5 metre £3.27

D-rings x 1 packet £1.45

Cotton dinosaur fabric x 0.5 metre £3.63

Simplicity Pattern Boys & Mans vest and tie 1 x £4.06

Incomparable ceramic buttons 5 x £1.72 (also available here)

(No extra cost for the Men's ties)

TOTAL = £12.13

I thought this project was exceptionally good value. As I had a shirt and trousers already, this was the cost for a waistcoat and a tie. I don't think they could have been bought in a shop for that!


(The fabric and notions for vest and tie were chosen by me and supplied by Abakhan Fabrics, free, as part of their challenge to sew on a budget)


Pin It Now!  

Sunday, September 30, 2012

Sewing on a Budget - Boy's Sweatshirt

After taking a break over the summer holidays, I'm back to blogging for Abakhan's Creative Budget Challenge. This month I decided to make a sweatshirt for my son. My two older boys go to a school where they don't need uniforms, so they wear more casual clothes instead. Abakhan Fabrics have a great offer on acrylic/fleece fabric, so I thought I would try sewing a sweatshirt. They also have some great tips for sewing with fleece on their website
 

As the challenge is to sew on a budget, I was aware of keeping all related costs to a minimum. The pattern is from a US sewing magazine Interweave Stitch, which can be expensive, especially if shipping charges are included, but luckily the patterns are also sold separately. This pullover/sweatshirt pattern is from the Fall 2010 magazine, but sells for $6 / £ 3.70 if downloaded alone as an e-pattern


Before cutting out, I compared the pattern to a sweatshirt my son wears a lot. I then sized up the pattern (by one size) and added about 5cm extra to the length.

I simplified the pattern by sewing the neck opening first, omitting the collar and facing and instead bound the neckline and sleeves with cotton tape. The sweatshirt is self-lined so that it would be warm and that the inside would feel as good as the outside.

It sewed up really quickly, less than 2 hours from pattern tracing to binding. In fact I sewed it so fast, I forgot to trim the seam allowances at the armholes, which accounts for some puckering there - though it doesn't seem to be evident when worn.


It's the first time I have used cotton tape, and I was pleased with how it worked. Though bias is usually better on curved seams, the tape has a loose weave, so sewed perfectly to the curved neckline.


Not including the pattern and the cotton tape, the cost was:

1.5 m acrylic fleece - £8.63/3= £2.88


If I include the pattern $6 = £3.70

and the cotton tape .5 m = £0.07

The costs were as follows: £6.65


A fleece sweatshirt, sewn at home, for approx £7 is incredible value!

 
There was a lot of funny posing went on while trying to get these pictures, he was delighted to get something made for him.


I still have 2 more 1.5 m pieces of fabric left. The boys won't be rushing to wear pink or neon green, so I will just have to make sweatshirts for my daughter and myself!


(The fabric for this sweatshirt was chosen by me and supplied by Abakhan Fabrics, free, as part of their challenge to sew on a budget)


Pin It Now!  

Thursday, July 12, 2012

Ribbons for boys ... and ribbons for me!

I don't sew very much for my boys, and even when I do, it is rarely clothing, especially for the older boys. So I have moved right outside my comfort zone for this post.


My 12 year old needed shorts, despite the serious lack of summer! I had some navy linen and cream cotton in my stash, that would make perfect shorts. I used a combination of two patterns from Ottobre (Winter 6/2009#27 & Spring 1/2011#39) to get the look I wanted, and checked with my son on the details he wanted!

The shorts were needed for casual wear - so we got a bit creative!

This is what we came up with - a navy linen pair of shorts with a turquoise striped ribbon, and also a cream cotton pair with a brown and orange grosgrain ribbon.

Sewing ribbon to the sides of the shorts, served two purposes for me. The shorts have a more casual look, and I was able to hide the raw edges of the side seams. By sewing the seams on the outside (putting the wrong sides of the fabric together and sewing the seam), I was able to sew the ribbon over the seam, also on the outside and this covered the raw seam edges.


This is what the inside looks like. I used Liberty bias binding - made by me - for the centre seam. The hems are finished with more ribbon to give them a clean finish and a little more weight


A lot of what I sew involves mixing colours and adding trims and ribbons, but for some reason it's the first time I thought of using ribbons on boys clothes. I ordered some ribbon from janemeans recently and many are perfect for boys clothes, especially the striped ribbons.


..... and ribbons for me....!

I'm about to have A LOT more fun using ribbons!

Jane Means ribbons in the UK were looking for bloggers to style their ribbons and post about it. Though their focus is gift-wrapping, many of the ribbons available are perfect for embellishing clothes. I was so incredibly pleased to get picked as one of a small group of bloggers to post about using Janemeans ribbon. It's such a motivating and challenging opportunity, all at the same time! I'm really looking forward to getting started.


Pin It Now!  

Thursday, March 31, 2011

Boy's Tailored Jacket .... continued....

Well, after that unintentional blogging break, my son made his Confirmation 3 weeks ago yesterday, and it was such a lovely, pleasant day, which was also incredibly busy, by the time all our brothers, sisters, parents, nieces and nephews arrived to our house after the ceremony.


The weather was unseasonably sunny for Ireland which meant the children (all 22 of them) spent most of the day playing outside in the garden, and the adults (18 of them!)were able to relax because the children were happy. Our families don't get together too often, simply because of the numbers involved, but all the planning, cleaning, painting and cooking is worth it when everyone has such a good time. It ended in in the usual Irish way - the sing-song!


There's always some bit of drama - my husband deciding to paint 3 main rooms in the house just two days before, and you know it didn't particularly bother me because my focus was on the jacket for my son that I felt it was 'necessary' to sew. I actually removed and re-sewed the 2 sleeves of the jacket the morning before the ceremony.


The saga of the jacket started with realising that the navy jacket I initially made was too short, despite having measured the length carefully and even shortening the pattern pieces to fit. So, 2 weeks before, I was making a new 'tailored' jacket! That looks very casual and flippant written down, but I can assure you I was not at all casual about it :-)


Luckily I had a really nice light wool fabric which I had thought I might sew up as a skirt or dress for me, and I cut up 2 old shirts for the lining. This fabric was much more suitable than the heavier navy wool, and it was easier to sew with.


On this version, I decided to go with a vent in the back and vents in the sleeves, using Burda instructions - not a great idea. Though the vents look ok from a distance, I was winging it.


The reason I was taking out the sleeves of the jacket the morning before, was because of an absolute beginners mistake - not marking the relevant notches and then (doh!!) decided to match the seams of the sleeve with the seams on the back of the jacket, simply because I thought it would 'look' better. The hours I spent trying to figure out why the sleeves were dragging so much on the shoulders ..........


My MIL gave me a lovely silver confirmation medal that my husband had also worn, so the night before I was 'googling' how to make a ribbon rosette! I sort of winged that too, but again, it looks better at a distance!


He looked very smart in his jacket, and I think the faults were only noticeable to me.


I learnt a lot by making these jackets, checking out the details on RTW jackets is very helpful, especially if sewing instructions are a bit vague, and leaving a good long hem allowance, measuring and remeasuring the jacket length, also marking notches very carefully (less said .....!), and probably most important - "do NOT procrastinate when sewing for occasions"


but I hope to avoid making another jacket for quite a while.
Pin It Now!  

Thursday, February 3, 2011

Sewing a boys jacket

There seems to be more thinking about sewing than sewing going on here at the moment, so maybe by getting it down in writing, I'll go and actually sew.

My 12 year old son is being confirmed on the middle of March, so I thought I'd make him something to wear. A few months ago when I asked him about clothes, he expressed a strong interest in a suit like James Bond .......... How do you answer that?!


Most boys seem to dress very casually for this religious ceremony, so we needed a bit of a compromise.
I had a look through Ottobre magazines where nothing really appealed, and then tried Burda Magazines where I found a pattern for a jacket that I thought might look ok, in the
Dec 2009 issue.


When he saw the picture my son agreed, so it was decided!


However ........

between the maze of patterns on Burdas pattern sheet ...


The alterations that had to be made to the pattern pieces (-that I almost missed) ....


Fittings and refittings, thankfully I have a patient son.


........this is where I am at. It's just really slow progress, with lots of figuring out, fixing and tweaking, and crossing of fingers. I'm hoping it will turn out ok


despite my inability to even pin the jacket straight for a try-on!


I mentioned a few posts ago that I would like to sew more for boys this year, I didn't imagine I would be sewing a tailored jacket!!


Pin It Now!