Showing posts with label Liberty of London. Show all posts

Thursday, May 28, 2015

A Girl's Dress with Ribbon Sailor Collar

Sailor dress patterns have been on my 'to sew' list for my daughter for quite a while. Mostly I've been hoping that they would become a fashion trend. After waiting years for this trend to happen and seeing this 2014 Oscar de la Renta dress, it seems that there is a 2015 nautical Spring/Summer trend which is extending into Autumn/Winter. These mentions are good enought for me!

The pattern I used for the dress is from a newly released English translation of Japanese sewing patterns from Tuttle Books. 'Sewing for your Girls'. I intended sewing this pattern for a review of the book, but took a few too many shortcuts and didn't follow the pattern exactly. I also sewed a second dress and will review the book in my next post.


The pattern pieces were cut from a second-hand man's shirt, and I included the centre front button bands from the shirt as the dress opening. This is very different from what the pattern suggests, but made it so much quicker to sew the dress....... and I didn't have to sew buttons or buttonholes!


The sailor collar pattern pieces (undercollar and main collar pieces) were cut from the sleeves.


The details are my favourite parts of this dress. Sailor stripes are usually created by sewing rows of a contrasting colour. Any of the striped and stitched ribbons at Jane Means would make an excellent choice for a collar like this. I chose a purple stitched janemeans ribbon which created the illusion of stripes. I mitred the ribbon at the corners for neatness, and used Liberty of London bias binding for the neckline and armholes instead of the facings in the pattern.


My daughter found these pom-poms and appliqué in my stash, so we added them and a purple ric-ric hem to complete the dress.


Pin It Now!  

Wednesday, July 30, 2014

Fun Sewing for A Toy Wedding

Not having much time for big sewing projects over the school holidays, there are still ways and means of getting some sewing in....


When my 3 year old niece wanted two of her toys to have a wedding & I got a request for simple wedding outfits, I needed no further excuse to get back to my machine.


This McCalls pattern 6005 was bought quite a while ago and it was a complete surprise when I realised that I had already cut out and organised all the tiny pattern pieces. The patterns don't quite shout 'wedding', however the pyjamas top was easily transformed into a wrap-around wedding dress by adding length and layers to the skirt part. The patterns for the leopard print coat and trousers were used for the grooms suit.


The veil, bow tie and shirt collar piece were my own creations! The fabric and trims were scraps and small leftover pieces, chosen on the premise that anything lacy and sparkly would appeal to my niece.
 
 
The 'wedding' had all the trappings of a true Irish wedding, though on a smaller scale in my brother-in-law's house with a meal, dancing, a disco and finishing with the national anthem! Of course, everyone was also talking about the clothes...


As an extra surprise for my niece, I sewed tiny (teaspoon-sized!) aprons as 'housewarming' gifts for the 'newly weds', inspired by the aprons I sewed in this post.


The grooms apron is Parsons Gray laminated cotton with janemeans beige narrow stitched ribbon as ties and a headband.


The brides apron is an Amy Butler laminated cotton, bought from this Irish shop (Pippablue). It has a Liberty print fabric pocket, janemeans narrow slate stitched ribbon ties, as well as a matching headscarf. The elastic was added to the ribbon at the neckline with a simple zig-zag stitch, to ensure the apron would fit over the head.


These little aprons were kindly modelled by Mickey and Minnie, before being delivered to a very appreciative niece.


Pin It Now!  

Sunday, May 18, 2014

How to Sew a Ribbon Hem

Sewing ribbon to the hem edge of a garment is an easy finishing technique. It adds an extra detail and can also be used to preserve the length of the hem. I regularly use ribbon to finish hems as well as sleeve and neckline edges, though I wasn't always confident in doing so. The soon-to-begin Belcarra Sewalong means that it's as good a time as any to show how I sew ribbon hems.


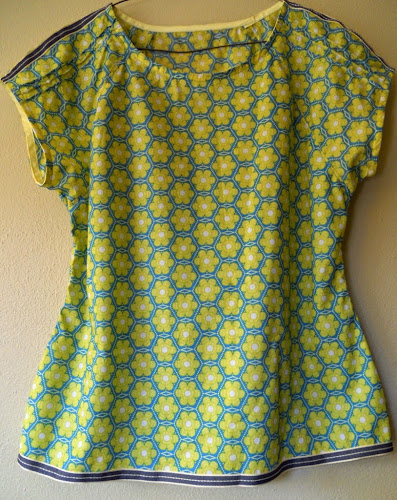
I sewed ribbon hems for the two Belcarra blouses from Sewaholic Patterns that I recently made. I liked the unhemmed length of the blouses, and didn't want to turn up a full hem. Also, the fabric in both was lightweight, so I wanted to add a little weight to the hems.


A huge variety of ribbons will work for hemming purposes. It is useful, but not necessary, to match the ribbon type with the fabric type. For the beige Liberty tana lawn cotton Belcarra blouse, I used a cotton stitched ribbon from janemeans. For the green AnnaMarie Horner cotton voile blouse, I used a polyester ribbon also from janemeans.

I would strongly recommend prewashing the ribbon in the same manner that you will treat the finished garment.


What you need:

-A sharp/new sewing machine needle

-Good quality grosgrain or cotton ribbon, the same length (+1.5cm overlap) as the hem

-Matching thread colour - matched to the ribbon colour rather than the fabric.

-Garment with side seams sewn & finished, ready for hemming


Step 1:

Place the wrong sides of the fabric and ribbon together. If the ribbon doesn't have a wrong side, choose one side as the wrong side.

Place the ribbon on the fabric so that the right side of the ribbon and the wrong side of the fabric both face up as in the picture

Ensure the ribbon overlaps the fabric edge by approx 1cm or up to half the width of the ribbon.


Sew the long left edge of the ribbon to the hem edge using a long stitch length. The line of stitching should be approx 2-3mm in from the long left ribbon edge.


Step 2:
When you have stitched all around the hem, cut the ribbon allowing for an extra 1.5 cm to fold under. Fold the end of the ribbon in by 1.5 cm and continue sewing. Backstitch when you have sewn the overlap. This line of stitching will become the lower edge of the garments hem.


Step 3:
Turn the garment so that the right side of the fabric faces upward. Fold the ribbon over at the stitching line, so that the ribbon covers the raw hem edge and the right side of both the ribbon and the fabric are facing up. Press the ribbon and fabric.


Step 4:
With the right sides of the fabric and ribbon facing upwards, sew along the edge of the ribbon, enclosing the raw edge of the fabric.


Step 5

When you reach the folded short end of the ribbon, sew across the ribbon width and backstitch to finish.


Step 6:

Press hem edge again.


This technique works perfectly on straight hem edges, but will also work on a slightly curved edge. If you wish to sew a ribbon hem on a circle skirt/dress edge, a narrow ribbon will work better.


Pin It Now!  

Wednesday, April 23, 2014

Belcarra Blouse - So good I sewed it twice!

The newest pattern from Sewaholic Patterns is the Belcarra Blouse, and I had the opportunity to test the pattern before it was released.

The style is a looser silhouette than I usually wear, but what surprised me most about the pattern was how the 2d curved pattern shapes transformed to 3d without needing darts or other fitting techniques. Though it is a loose-fitting style, it works by also being shapely...or making the wearer look shapely!

The size I cut was 12 and this is what usually fits me best in Sewaholic patterns. Sometimes I have to shorten above the waist, but I didn't do that for the Belcarra, as my measurements of the pattern pieces in comparison to my body measurements indicated I didn't need to.


The biggest difficulty I had with this blouse was fabric selection I just couldn't decide what to use. I originally planned on a medium weight black and white cotton gingham but thought that the loose style of the blouse wouldn't be as flattering in a heavier fabric. So I picked Liberty of London cotton voile 'Toria' that I'm delighted with.


http://sewaholic.net/also-introducing-the-belcarra-blouse/


Tasia's advice on choosing fabric for this blouse is spot on - pick something special, because the lack of front and back seams and darts mean that the fabric gets the limelight!! Her Liberty of London version illustrates her advice perfectly.


I chose to sew View B mostly because of the tucks in the raglan sleeves. They are such a neat detail on this lovely simple design. As the print on the fabric is so busy, the tuck detail seemed to get lost, so I added some matching janemeans ribbon to the shoulder seam to help draw attention to the tucks.


Using the same stitched ribbon as I used to cover the shoulder seams, I repeated the ribbon detail at the hem. I liked the unhemmed length of the blouse, so adding ribbon meant that I could keep most of the blouse length.
 

As the voile fabric is so light weight, I wanted to ensure it would hang well. Another reason for sewing a ribbon hem is that it adds a little extra weight to a fabric like voile.


The second Belcarra blouse was a very quick make-not even a couple of hours! The fabric is also a cotton voile from AnnaMarie Horner. This version came about as a result of #misemademairt / #misemademáirt (general Irish to English translation = Me Made Tuesday). Three of us - also Maeve & MsMcCall - from Ireland have been wearing something we made ourselves for Tuesdays in Feb and March and posting on Instagram. This was my attempt to wear something me-made and green(ish) for St. Patricks Day.

For this version, I slightly adjusted the neckline. The neckline in the pattern pictures seemed wider than I prefer, so I made a simple adjustment by adding an extra seam allowance width to the top of the sleeve pieces and back and front pieces. I also measured the resulting neck opening and compared it to my head measurment to be sure it would fit! The length of the neck binding also needs to be reduced to fit the new neck opening measurment.


Even though the blouse is a simple style, there are some neat techniques in the pattern. The bias binding is sewn doubled over and this gives a nice flat finish. The sleeve cuffs are also well designed. I didn't compare my arm measurements with the cuff length, before cutting and sewing. The sleeve cuff fits, but I would usually wear it a little looser.

The blouse makes for a very easy-to-wear top and I love the raglan sleeves. Now that I know that the style fits in a flattering way, I would like to try it in gingham, with a bias pocket and tucks on the sleeves forming a neat design with the lines of the gingham fabric.


Pin It Now!  

Tuesday, March 11, 2014

Sewing a First Skirt for Me! Introducing Zlata.

Stepalica Patterns have released their second pattern and it is another interesting and clever design, like the first pattern The Nougat Dress.

If you want a skirt with an unusual design, which is a fun challenge to sew and where you will learn a unique way to form belt loops, I would have no problem in recommending this gorgeous skirt pattern.

When I heard that AnaJan was looking for pattern testers, I volunteered. I don't wear skirts much, tending to prefer dresses, and I was somewhat dubious that the pleated Zlata would suit me. But because of the interesting design and the stitched down pleats, I'm very happy with my new skirt!


The pattern is a PDF (download) pattern which has three variations and I sewed View A in a Liberty poplin fabric. All the details are on the Stepalica blog with posts and pictures of each of the 3 styles and there is a sewalong of the Zlata also in progress.


The pattern testing process ran smoothly and I found the pattern and instructions were very clear. It needed intense concentration because of the unusual design and being the first adult sized skirt I've sewn. AnaJan was very appreciative of my efforts at pattern testing and mentioned it on her blog.


To make the sewing even more difficult for myself, I added ribbon to the yoke/skirt seam. I have used this technique a few times before, and it is a really neat way to add or highlight a design detail, as well as hiding the raw edges of a seam. The ribbon I chose is a pink stitched ribbon from Jane Means, which coordinates very well with the Liberty print. I was very excited that this inspired AnaJan to sew another version with a ribbon trim which appears as her View A.


Choosing to edgestitch all the pleats, ie. four times for each pleat added to the concentration I needed for this pattern. I didn't realise until I was halfway through that I have an edge stitching foot for my machine.


Though the edge stitching is a time consuming process during sewing, it makes a dramatic difference to the wearability of the skirt. The fabric will hold the pleats, both in wearing and washing so all the effort will be worth it and it's a step I would highly recommend.


The Zlata skirt also has pockets, which I lined with a silky lining fabric and this picture shows the stitched ribbon colour, seam matching and the edge stitching even more clearly.


The colour of the lining was as difficult to photograph as the colour of the skirt fabric, but this inside view of the skirt shows the facing and understitching which I also added.
 
 
And finally, an 'action shot' which shows how the pleats hold their shape (ignoring the milky white Irish legs!!!


Pin It Now!  

Monday, October 28, 2013

Japanese Sewing Patterns for Children - in English!!


It's no secret that I love Japanese Sewing Pattern Books. A quick search through the blog will show up many clothes that I've sewn from Japanese language books.

The popularity of these books meant that it was only a matter of time before English versions would be available. So getting a chance to review two newly published books from Tuttle Books was very exciting!


The first book is from the Happy Homemade series and is called Sew Chic Kids. It is a translation of a Japanese pattern book by the same author, Ruriko Yamada, and it's the first time I've used an English translation of a Japanese sewing book.


It's a cleverly planned and designed book where a number of basic bodice and pants/trousers pattern shapes are transformed into 20 different patterns for boys and girls aged 2 to 8 years. There are 7 patterns for boys including a shirt with a stand-up collar that I really want to sew.

In total, there are 7 dresses, 5 tops/blouses, 2 shirts, 5 pants/trousers/shorts and 1 skirt. Each pattern is identified with a letter of the alphabet, and this is used to find the pattern pieces on the pattern sheets that are included. Seam allowances must be added to the pattern pieces and the book includes information on how to do this, as well as illustrating the seam allowances on the fabric layouts for each pattern.


For anyone who has previously used the Japanese language sewing pattern books, you are in for such a treat!
Now, instead of skipping over the Japanese symbols, just admiring the beautifully taken photographs, and then turning to the diagrams and illustrations, you will have the pleasure of being able to easily read all the important and fun details that give character to a book.


Because I am so familiar with the Japanese versions of these books, it seemed a good idea to sew from this English language version.

I chose the first dress in the book 'a' and used a Liberty of London fabric with a linen solid for the yoke. Each step in the pattern instructions is numbered, with a diagram for each of the steps. This makes following and understanding instructions very straightforward.


The print is very busy, so I changed the application of the armhole binding by applying it to the outside for a pop of colour. The technique to sew the back placket was clearly illustrated so despite not having sewn one in a while, it was easy to sew.


The simple designs of the clothes and patterns in this book hide the varied and complex sewing techniques that are used in their construction. These techniques include the application of bias binding, sewing a placket, sewing pintucks, inserting elastic in a casing, sewing a faux fly, making buttonholes (see picture), and others. All of these techniques are clearly explained using numbered diagrams.
Both inches and centimetres for measurements are used throughout the book, and a chart for children's measurements makes choosing a size easy.


This book would be very useful for a beginner at sewing. It has sections on the basic tools that are needed, sewing machine tips and information on different fabric widths.
There is also incredibly helpful information on matching needle sizes, to thread sizes and to fabric types, which I haven't seen mentioned in many sewing pattern books.

I am sewing a silk chiffon top from the women's version of this book Happy Homemade Sew Chic, and will do a follow-up post on it once the top is finished


Pin It Now!  

Thursday, July 25, 2013

Pattern Testing (and talking to) the Sewaholic Saltspring

 
I have clear ideas on the styles that I like to sew, and that I think suit me, but sometimes an opportunity comes along that pushes me out of my comfort zone. Having previously sewn the Lonsdale Dress and the Minoru Jacket from Sewaholic Patterns, I was delighted to get to test Tasia's new pattern the Saltspring Dress.
It is a deceptively simple style which hides the cleverness of the design. The shorter inner bodice layer and the longer outer bodice layer are joined inside, to make an elastic casing which then gives the dress it's blousiness.
What makes the dress work, and gives it shape, is how it is designed. For example, the skirt pieces are shaped, rather than being rectangles, so that there is not too much bulk when it's gathered with elastic at the waist. Tasia has taken a relaxed shape and designed a very flattering dress. She has given a detailed description of the dress on her website, with lots of great pictures.

I tend to wear more fitted styles, so when I first saw the line drawing of the Saltspring Dress, I wasn't sure how I felt about the blousy style. Having wide shoulders and hips, I thought the dress would give me a more rectangular rather than curvy shape. This was the major reason I chose chiffon and satin so that the dress would be very, very 'drapey'. However all niggly doubts disappeared when I tried the dress on for the first fitting. I had an 'Oh wow!' moment, impressed at how flattering it was looking and even surprised that liked how it was going to look on me. And, as a another plus, I've wanted to sew a red chiffon dress forever.


The chiffon and satin are sewn with French seams at the bodice and skirt side seams, so I omitted the pockets in the skirt side seams for this version. I had to add a lining to the skirt as the chiffon is sheer. This involved cutting skirt lining pieces using the back and front skirt pattern pieces and then treating the main skirt and skirt lining as one at the top and at the zip, following the pattern instructions.

It's definitely a dress to make an impression! especially the maxi length. I asked my husband for help with hemming the chiffon and the satin after allowing the dress to hang for a few days. As this absolutely wouldn't be my usual daily attire, he was almost speechless when he saw it on me - the exact words were "you....are like....a......Greek" I'm really hoping he was going to say 'goddess' but he was so stuck for words he didn't quite finish what he was saying!


I had a lot of trouble with the straps, which is no reflection at all on the pattern or instructions, but rather on the fact that I have avoided turning straps at every single opportunity, by using ribbons instead.

This time I wanted to follow the pattern and sew spaghetti straps, so I persevered. I was using the needle and thread method but I was getting stressed and frustrated that I couldn't get the end of the strap to turn.


After checking the Internet I saw a reference to a drinking straw. Amazingly and simply it worked, and I was able to turn these lovely narrow straps! I wrote up a How-to for anyone else who struggles with this.


The zipper insertion looked a little complicated initially because it has to be attached to the bodice lining while also maintaining the blousiness of the back bodice. Tasia's instructions are, again, very clear on this and it turned out perfectly.


Sometimes I have the experience of a pattern literally 'talking' to me, hopefully I'm not the only sewist that this happens to! .......

Saltspring: "I really, really, really want to be sewn in jersey, please please, please?"

Me: "No, that's ok, I'm happy to sew you in chiffon, it's just the right drape for you."

Saltspring: "Well, Liberty jersey has a drape too, and there some lovely striped jersey on Susan's Sewbox website."

Me: "I don't really have the time to sew two versions so...."

Saltspring: "Mmm, what about using these perfectly matching ribbons for the straps and omit the zip, that will be much faster, please, please, please!!!"


Me: "wellll...."

Saltspring: "and you can cut the stripes on the bias for more drape and for fun chevrons"

Me: "ok, ok, ok"

Saltspring: "Yes, yes, yessss!!!!!"


So I just couldn't resist a version in jersey, and it's a medium weight jersey, so I was surprised the dress worked in this heavier fabric.


As this was the second version I sewed, I made some changes.


To sew the chevrons, my first attempt, I added an extra seam in the centre front bodice and the centre front skirt and cut the striped fabric on the bias, matching the stripes.


There was no need for the zip as the stretch of the fabric and the elastic at the waist allow the dress to be easily put on and taken off.


The pictures don't accurately reflect the colour of the ribbon from Jane Means. It's a bright turquoise, with a strong contrasting deep pink, and it perfectly matched the colours of the jersey, irresistible really!


And the real test? I love how these dresses turned out and they have been worn, a few times. The jersey dress has been perfect for the beach in our recent heatwave, and I wore the red chiffon dress going out for dinner on holidays........


Pin It Now!