Showing posts with label Ottobre. Show all posts

Monday, May 25, 2015

Sewing Swimwear, without clear elastic

This orange Lycra fabric was a remnant that my daughter picked when we visited Dublin last October. As she has just started swimming classes in school, it was the perfect time to sew a new swimsuit.


The design process was a lot of fun. She wanted a swimming costume with a skirt and then thought for a while about which TV/book/film character who wore/was orange. She came up with 'Applejack' from My Little Pony. The most distinguishing part of any of the ponies is their 'cutie mark' so the three apples were appliqued to the skirt. The rosette isn't part of the character, but was created to continue the pony theme.


I am not confident sewing with stretch fabric and even less so with Lycra fabric. I used a small-sized ballpoint needle to prevent holes in the fabric. When I realised that there was no clear elastic in my stash I almost didn't sew this. A quick internet search led me to an excellent tip on Patternreview. In fact It includes more than one tip.
  • It describes how to sew swimwear with regular elastic.
  • It describes where to stretch the elastic for a better fit.
  • It describes where to zig-zag on the elastic so that the edge of the fabric covers the edge of the elastic (Read the comments on the tip).
  • It also describes how to use a regular straight stitch on the outside.
Following these tips made sewing the elastic in the arms, neckline and leg openings very straightforward and much easier than the last time I tried. It has made me much more confident in sewing swimwear.


Though it's very acceptable to use a zig-zag stitch on swimwear, I much prefer how the straight stitching looks on the outside, and I was surprised how much it stretched with the fabric.


The pattern is adapted from Ottobre 3/2011 no30 and the skirt was drafted using the hip circumference measurement and sewn with a stretch stitch.
 

This swimsuit sewed up so quickly that we're already planning more 'My Little Pony' versions. However sourcing swimwear fabric in Ireland is not at all easy. Any Lycra fabric available is mostly marketed as dancewear or for costumes. We'll be crossing our fingers that it won't disintegrate in chlorine!!


Pin It Now!  

Thursday, June 27, 2013

Sewing on a Budget - Swimsuits for Mother & Daughter

Swimwear has been on my 'to sew' list for a while, and I've always admired how Cindy manages to sew lots of great swimsuits for her family.
Last year I got as far as buying and tracing patterns. So when I found this lilac Lycra fabric from Abakhan Fabrics and this really sweet stretch gingham trim, I decided to try sewing swimwear on a budget.
In the last few months, the push to sew swimwear came in the form of a 'Swimalong' This is where bloggers and sewists support each other while sewing swimwear under the guidance of Lelia and Katie. These generous bloggers have produced really excellent & helpful posts all about sewing swimwear. So any information you could need about fabric, patterns, sewing techniques, finishing seams can all be found on their swim along posts.


The details of the fabric and haberdashery for these two swimsuits are:
Nylon/Lycra swimsuit fabric 150cm x 1metre =£10.25
Stretch gingham with double frill edge x 2metres = £1.40
Swimwear elastic = £2.99
(Patterns, button and cotton lining from my stash)
Total = £14.64 for 2 swimsuits. Considering that the adult swimsuit was fully self-lined, this represents excellent value, as a similar RTW version could cost from £50 upwards.


I started with a swimsuit for my daughter. A child's swimsuit is more straightforward as it doesn't need lining or support and provides a perfect opportunity to practice techniques. This pattern is from Ottobre magazine 3/2009#38
I used a coverstitch to sew this swimsuit, which is a stretch stitch that looks a little like how a serger sews.


Then I progressed to sewing my own. I had the KwikSew 3416 swimwear pattern that I bought a few years ago but changed View B up by adding a ruched panel in front and adding lining and support.
This suit was sewn completely with a small zig-zag stitch which is on almost every sewing machine.

This was much more work than the child's version, but mostly because of the changes I made.
One part I was particularly pleased with were the straps which I wanted to be narrow, unlike the wider straps of my daughters swimsuit.
 Hers were sewn by folding them in three and zig-zagging the length.
Generally turning narrow straps is awkward, so I found an easy way that involves using a drinking straw. This makes sewing narrow straps much simpler and works for jersey, cotton and other lightweight fabrics.


The trim wasn't meant to be 'matchy' with my daughter, but added to cover some of the uneven zig-zag stitching.


My favourite part of sewing the swimsuits, was the seahorse appliqué on my daughters suit. This was remarkably easy, and is sewn with a straight stretch stitch unlike appliqué for woven fabric which is often sewn with a satin stitch. The outline for the seahorse is provided in the pattern magazine and the instructions suggest Bondaweb to attach the seahorse to the swimsuit, and then to sew around the outline.


(The fabric and notions for these swimsuits were chosen by me and supplied by Abakhan Fabrics, free, as part of their challenge to sew on a budget)


Pin It Now!  

Friday, February 22, 2013

Bubble Dress in Liberty

I've 'mentioned' before how much I love sewing dresses, but it's the little baby dresses that I enjoy the most, and bubble dresses would be the favourites.

This dress wasn't on my list for February, but a friend recently had a third baby girl, and I couldn't resist sewing such a tiny dress (6 months).

The fabrics are from Liberty and probably not colours that would immediately come to mind for a baby girl. However, I had sewn dresses for my friend's two older daughters in June of last year, and decided to use these fabrics again. I suppose the dresses really are much too matchy!!!

For a little difference, I sewed on a beautiful dusky pink/raspberry stitched grosgrain ribbon from janemeans which picked up colours from both fabrics.
I found a template for a dress card, and just had to add a little stitched ribbon to that too.


The pattern is from Ottobre 6/2012#7 and it's the first time I've used it.

When deciding on patterns for baby dresses, I usually pick those that will be comfortable for the baby to wear. This baby pattern from Ottobre is the one I have used the most, here, and here though trying to tie the ribbons with a wriggly baby might be difficult!

This bubble dress pattern is ideal for baby presents and easy to put on & take off because of the length of the zipper


I generally avoid zippers on little clothes as I imagine they could be uncomfortable for a small baby. This pattern has a zipper, so I added a placket to the pattern to cover the zip on the inside.

It's a rectangular piece of fabric, about three times the width and 3 cms longer than the zip. I sewed it in, while attaching the lining to the zipper using the same method as for this Liberty dress. The placket is crooked! but at least it's on the inside! For a first attempt, it worked and should be very comfortable for the baby to wear


I was particularly pleased with how the ends of the ribbon were aligned at the centre back!

For the older sisters, I made some hair ties using a free pattern from Oliver+S.


Perhaps it's from watching too many old films, but the idea of a dress presented in a box has always appealed to me! A shoe box, lined with tissue paper, was the perfect size for this dress. The logos were covered with washi tape and I tied some more narrow stitched ribbon in a bow to add to the fun of opening it!


Pin It Now!  

Sunday, October 28, 2012

Couture for a Sweet Little Witch

This detailed costume is procrastination sewing at it's very best. I really wanted to sew a winter coat for me and because I couldn't decide on a pattern, my time, sewing and creativity all went into this costume instead, and no, I haven't still started on the coat!


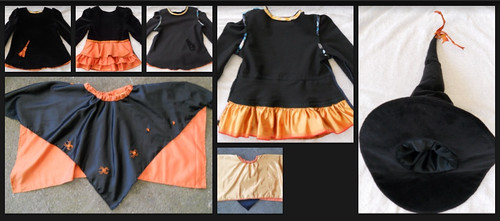
My daughter wanted to be a witch this year, and had no specific ideas, except that she wanted a 'spiky' skirt. Initially I thought a simple black jersey top with a simple gathered tulle skirt would be ok. A search through my stash however, turned up a black cotton stretch velvet, black lining fabric and an orange polyester 'silk' which was almost an exact match to some two-toned copper wired ribbon, the brain cells started whirring , and this is what resulted ......

The hat and bag were sewn first. The bag is the self-drafted pattern I used recently for the green velvet and Liberty bag. I sewed some cat ribbon (from janemeans) to the velvet, and used the copper ribbon (with the wire removed) for the handles.


For the hat, there's a free adult-sized downloadable witches hat pattern on Fabric.com which I used. The cotton velvet fabric, even though I interfaced it, isn't quite strong/stiff enough - a home dec fabric or canvas would have been better. It still worked, with some changes - I lined the hat, added copper wired ribbon to the top for embellishment, and where the pattern says push down the pointed part to create folds, I sewed the folds to keep them solid. The hat is quite high. If I was sewing it again for a child, I would reduce the height by about 10 cm at the widest part, or would sew the smaller witches hat in the pattern and attach it to a hairband.

The skirt was sewn next. I was wondering how to make it 'spiky'. I could have cut triangles out of the hem of the fabric, but thought the fabric would just fray. Then I remembered a dress in Ottobre 3/2007#16 which had a square skirt. I used the general square shape of the pattern, cut an orange square longer than a black square, both size 116 at the waist with no seam allowances. This meant the waist of the skirt was big enough to gather into a waistband I drafted myself.


When it came to the ruffled top, I liked the look of Ottobre 1/2011#20 (cover picture) and found I had traced it a few years ago. I didn't have enough fabric to cut 3 circular ruffles, so the lower 2 are gathered. I sewed the top ruffle to the outside back and sewed copper ribbon (with the wire removed) on top to cover the seams. The copper ribbon is also used for the hem of the front.

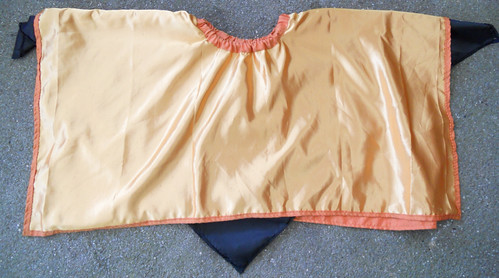
The couture part of the title? Well I know it is only a costume, but I bound all the seams of the ruffled top, mostly because the fabric frayed a lot. The raw seams of the skirt waistband and hem are also enclosed.

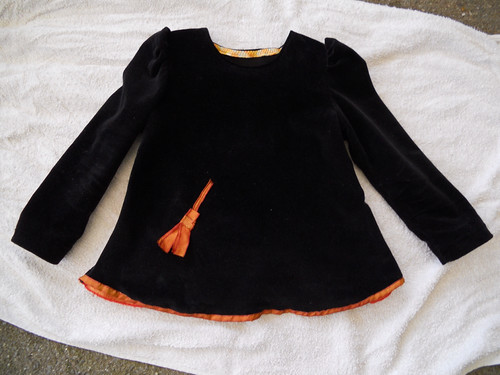
The front of the top was a very plain (the Ottobre pattern has a peacock on the front) so with a few folds and cuts of the wired ribbon, I made a little broomstick.

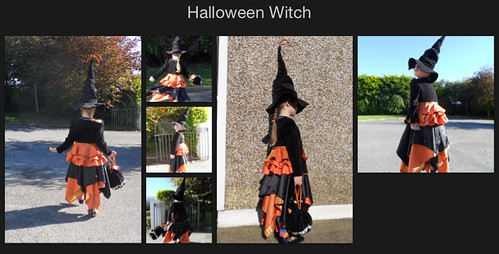
The skirt has some glitter spiders sewn on by hand, which I had left over from another witches costume sewn for my niece a few years ago.

She has worn it a few times already, to her school Halloween party and to her friend's Halloween birthday party. Every time I see it on her it just makes me smile - it's so over-the-top, and twirly and ruffly! and so NOT scary!


Pin It Now!  

Thursday, July 12, 2012

Ribbons for boys ... and ribbons for me!

I don't sew very much for my boys, and even when I do, it is rarely clothing, especially for the older boys. So I have moved right outside my comfort zone for this post.


My 12 year old needed shorts, despite the serious lack of summer! I had some navy linen and cream cotton in my stash, that would make perfect shorts. I used a combination of two patterns from Ottobre (Winter 6/2009#27 & Spring 1/2011#39) to get the look I wanted, and checked with my son on the details he wanted!

The shorts were needed for casual wear - so we got a bit creative!

This is what we came up with - a navy linen pair of shorts with a turquoise striped ribbon, and also a cream cotton pair with a brown and orange grosgrain ribbon.

Sewing ribbon to the sides of the shorts, served two purposes for me. The shorts have a more casual look, and I was able to hide the raw edges of the side seams. By sewing the seams on the outside (putting the wrong sides of the fabric together and sewing the seam), I was able to sew the ribbon over the seam, also on the outside and this covered the raw seam edges.


This is what the inside looks like. I used Liberty bias binding - made by me - for the centre seam. The hems are finished with more ribbon to give them a clean finish and a little more weight


A lot of what I sew involves mixing colours and adding trims and ribbons, but for some reason it's the first time I thought of using ribbons on boys clothes. I ordered some ribbon from janemeans recently and many are perfect for boys clothes, especially the striped ribbons.


..... and ribbons for me....!

I'm about to have A LOT more fun using ribbons!

Jane Means ribbons in the UK were looking for bloggers to style their ribbons and post about it. Though their focus is gift-wrapping, many of the ribbons available are perfect for embellishing clothes. I was so incredibly pleased to get picked as one of a small group of bloggers to post about using Janemeans ribbon. It's such a motivating and challenging opportunity, all at the same time! I'm really looking forward to getting started.


Pin It Now!  

Thursday, January 6, 2011

Vanity Cases! - Gifts for nieces

I had started sewing these a few weeks before Christmas, to see how they would turn out as I was hoping they would be good enough for gifts. The first two I made were with the Kaufman Ladybird fabric, and Ottobre decided to add seam allowances for a change, and of course so did I. I can't say that it was fun having to go back and cut the allowances off of interfacing, fabric and batting!!


After making the first one, I made some changes to the construction method. I sewed the lining and fabric to each side of the zip at the same time. Also I sewed binding over the zip ends after joining them together to form a circle, this made for a much neater finish. My daughter claimed one of the cases at this stage, and wanted me to give the other to her cousin who is also her best friend.


I added ribbons to the zip-pulls to make them easier to open.


This cousin has 2 older sisters, one being my goddaughter, and I had it in mind that I wanted to make them cases too. They didn't get made before Christmas, even though I had the fabric cut out, as I was trying not to pile too much pressure on myself. On Stephen's night, I finally decided that I would make 2 more cases as we were visiting these cousins the following day.

The case with the Farbenmix owls is for my goddaughter, and 4th one without owls or ladybirds is for her 9 year old sister as I wasn't sure if she would find the others too babyish.


For the lining, the striped fabric is a heavier cotton from DotsnStripes, last year, and the other cottons I bought locally.
I sewed them fairly quickly, despite mistaking the handle pieces for the side pieces, and I love how they turned out. After making 4 of them, I don't want to sew circle pieces to straight pieces for a long time, but I will make them again........... sometime!


Pin It Now!  

Saturday, January 1, 2011

Ottobre Winter Clothes

This year it took me ages to start sewing my daughters winter coat. I found it very difficult to get a wool fabric in a bright colour. Eventually I bought a bright pink from "Threads of Green".

The pattern is from Ottobre 5/2006, a lovely coat pattern, that I made without any alterations to the pattern!!!

The lining is my favourite, a liberty poplin bought from Sewbox, a UK online shop. It also took me forever to find a lining fabric that would match the bright pink. So that it would be less extravagant, I lined the sleeves and the inside of the beret with a very cheap cotton voile.

It must be the colour of this coat, but it get's loads of compliments!


This is the dress I made for my daughter for Christmas. The pattern is Ottobre 4/2005 which I modified. So, I changed the hem, cuffs and collar and added a lining and netting. I picked the pattern because I liked the design of the bodice, and I topstitched the princess seams in black just to add detail.


The fabric is an embroidered and embellished silk that had 75% off in a sale in Hickey's, Cork. It was originally €60 a metre. Getting it for €15 a metre meant that I wasn't worried about cutting or sewing the fabric. I would have been terrified to cut it at full price!


The black velvet trim was bought locally and is a beautiful cotton velvet, also expensive, but I needed less than a quarter of a metre. I love how it looks and my daugher even agreed to wear her serviette tucked around her for her Christmas dinner - something she normally refuses! I pre washed the fabric, so it will go back into the washing machine, maybe after today's dinner.


I know I only write here mostly about my daughter rather than my sons, because mostly I sew for her. My eldest boys get most of their good clothes bought for them by my mother, and my husbands mother knits jumpers for them. The 3rd boy has lots of good clothes passed down from his brothers, so there is nearly enough to clothe 3, 5 year olds!

I'm not a great one for making resolutions, but this year I would like to sew more for my boys! Let's see how that goes!


Pin It Now!  

Wednesday, October 20, 2010

Baby dress, Baby pants, and baby shoes

Another niece and her Christening means sewing and more sewing.

I originally had a metre each of these 2 fabrics. Firstly I made these for another niece, then I made this for my daughter, and I just had about enough to make the little dress, pants and shoes, with a bit (loads) of creative matching of bits of fabric, especially for the pants and shoes.

That makes 3 dresses, 1 dolls dress, 2 hairbands, 2 hats (one not pictured), 1 baby pants, 1 pair of shoes from 2 metres!

OK back to baby clothes ...


The dress pattern is Ottobre 3/2007#1, which I also made for another niece's christening. The last time I made it reversible, this time I didn't, but I lined the top part instead, to help hide seams inside.

This is a great baby pattern, easy to sew and should be few fitting issues because of the wrap-over at the back.


The Baby Pants pattern is Burda 6/2001#151. I lined these with the gingham fabric mostly to hide the seams where I was matching bits of fabric. The lining makes the pattern much simpler to sew.


For the baby shoes I used a Favourite Things pattern for ballet slippers.


(here they're stuffed with blue socks to help them hold their shape)


These are very cute, but really not at all practical. The sizes on the pattern go right up to adult size, can't really say they'd be for me!
Pin It Now!  

Friday, July 16, 2010

A New Niece ......... and more sewing of course!

This little dress is a present for a new niece who will be christened tomorrow.


The pattern is Ottobre 3/2007#1 and the fabric is organic cotton. The floral pink fabric is from Volksfaden (Sweet Jane by Harmony Art).


It wraps over at the back.


and has decorative stitching on the front (not a good pic)


I wouldn't be me if I didn't make sewing it awkward! - so I changed the pattern by making the dress reversible.


.... with a little surprise underneath


The pattern for the baby pants are from Burda 6/2010#151, and really made me smile - they are so cute!!


The pink stripe fabric is also organic and Fairtrade and is from a Welsh shop


Hopefully it all fits!


Pin It Now!  

Saturday, May 1, 2010

Ottobre Dresses for Dolls

I don't know why I didn't do this before, but now that I have, it seems such an obvious thing to sew. I never learnt to sew formally, but have very strong memories if sewing clothes for my doll (yes - only one!). Now that I have plenty scraps, and my daughter has plenty dolls - dresses for dolls is such a great idea.


These dolls dresses are presents for nieces - to match dresses I made, modelled by 'Baby Borns' that are over 12 years old passed on by my daughters 15 year old godmother.


My daughter loved the dresses on her dolls, so I have promised I will make more including some that match her dresses.


The dolls dresses are from Ottobre 1/03 and are reversible


There is a also a headband pattern in the Ottobre magazine, so I adapted it and made 2 child sized and 2 for the dolls. Maybe next time I will make bloomers to match.


Pin It Now!