Showing posts with label Stenzo. Show all posts

Thursday, September 20, 2012

Japanese Bubble Dress - twice!

There's still wedding related sewing going on - these are dresses for my SIL-to-be's nieces. The pattern is from a Japanese Pattern Book that I've used a few times before
I was encouraged to sew these again by the Balloon Dress Sew-a-long on the Japanese Sewing Books blog (written by Yifarn and a 'must-read' for anyone interested in Japanese patterns).
 
The fabric is a babycord from Stenzo, and while I didn't want the dresses too matchy, I couldn't resist swapping the pocket fabric.


The Sew-a-long is very helpful, but I made a major change to the pattern to ensure the hem seam would be hidden.
I will try to keep it short!!
  1. Cut the outer and lining back pattern pieces as 2 pieces and include a seam allowance where the fold line is.
  2. Sew the outer fabric at the shoulders. Sew the lining fabric at the shoulders.
  3. Put the lining and outer fabric right sides together and sew at the armholes and at the neckline (stop just at the seam allowance at the back neckline.
  4. Turn the dress right side out by pushing the right and left back pieces including lining through their corresponding shoulders.
  5. Sew the side seams of the outer and lining fabric on both sides, matching seams.
  6. Sew the centre back seams (leaving an opening for turning) just as far as the back opening. Turn the seam allowances at the neckline to the inside and press seams flat on lining and outer fabric.
  7. For the button loop, one method is to Insert and pin a loop of thin elastic into one side of the neckline from the outside.
  8. Topstitch the neckline, including the back neckline opening, Topstitch the armholes also.
  9. Attach pockets as per pattern.
  10. Gather the outer dress hem.
  11. To sew the hem, pin only about 2 inches/5cm of the back seams of the lining and outer fabric right sides together.
  12. Turn the dress inside out through the opening in the back lining seam, keeping the pins in place. Continue pinning the hems together (the dress outer and lining will almost form a loop. Sew the lining and outer hem together.
  13. When the hem is sewn, turn the dress right side out through the back opening, and hand sew the opening.
  14. Ta daaaa!!!! Hopefully!
I much prefer to sew the dress this way, and it leaves it looking very neat.


The twins are about 1 year old, and I made the dresses larger so there should be no problem with fit. It's a perfect dress to give as a present, when you have no measurements, because the fit at the chest is generous.


Edited to add: Linked to Justine's Sew & Tell Saturday Pin It Now!  

Wednesday, June 27, 2012

Colourful Teacher Gifts


Last year, for teacher gifts, I made the Mother & Daughter Totes from Oliver+S which is one of their free patterns. I'm not sure why I didn't make them again this year, but this pattern on Sew4home caught my eye.

It is a Roll-up Makeup Brush Case, made with a wipe-clean lining. Most of these type of patterns have square corners, but I liked the curved corners and the Sew4home website gives a template for this.


It's a lovely easy pattern and what took me the most time was joining the bias binding on the outside.

This is the inside of one of the rolls with some mini brushes inside


and opened out to get the full effect.
I used a very varied mixture of fabric from Stenzo, Hilco, Moda, Farbenmix, Patty Young and laminated cottons from Amy Butler and Anna Maria Horner.


I've had a lot of fun making these, matching and mis-matching colours of fabrics, bias and ribbons. I have 2 more to make and that will be the end of my assembly-line sewing for a while.


Pin It Now!  

Monday, June 6, 2011

Lots of Tea Parties ....1

There's quite a few sewing pictures that I haven't posted recently, and I think most of them involve some version of the Oliver+S Tea Party Dress. I had no interest in buying this pattern for a long time, mostly because I thought it looked basic and I have sewn a good few pinafores(jumpers) and also it's lack of 'twirl'! But I kept coming back to it because of the curved yoke seam, which I have seen in some vintage childrens patterns.


Finally I gave in and bought it about 6 weeks ago, and it is already up there as one of my most used patterns.


This dress was a birthday present for a niece who has turned 5 and she's my daughter's most favourite cousin. She's tall, so I had to grade the pattern up to a six, which was more time-consuming than difficult, because it is a multi-sized pattern. The fabric is Stenzo cord from DotsnStripes, and I have completely forgotten where I got the elephant ribbon from.

I lined it with some Robert Kaufman Toyland fabric, which I thought she might like and to make up for the lack of twirl, in case that might be an issue.
The seams of the dress are finished with flat-felled seams, these are covered in a tutorial on the O+S blog.


The buttons were in my stash and matched perfectly. And the piping, my first time doing piping, and the directions took all the fear out of it. I even had to put piping on the doll's dress!

And of course my daughter got to model it, with all the accessories. The bag is the same Japanese pattern that I've used a lot recently.


My verdict on the pattern - well worth the investment, even for how to learn to do piping alone, and the directions for how to sew curved seams are also very good.

More Tea-Parties to come ....


Pin It Now!  

Monday, May 9, 2011

My favorite kind of sewing - girl's dresses

I've been sewing lots of girls dresses again recently because of family occasions and niece's birthdays. After sewing my son's jacket, it is just such enjoyable sewing to be able to put colours and fabric and trims together and turn them into pretty dresses.

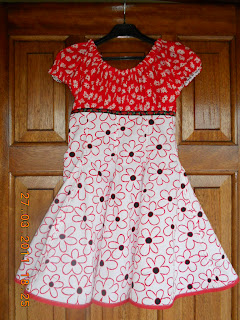
This dress is the Farbenmix Elodie pattern again, the first of 2 dresses I made for my god-daughter. She turned 6 the end of March and as the pattern is sized 5-6 and 7-8, I drew a line between these 2 sizes, which roughly corresponded to 6-7 (I hoped!)

The red fabric was bought locally, the skirt fabric is a Stenzo cotton from DotsnStripes and the ribbon is also from Farbenmix.

The picture above shows the inside back with the zip covered, and below shows the seams finished by turning them in and topstitching them.
There are 8 panels in the skirt, and sewn together they make a circle at the hem, which I hemmed using bias binding.

No hats this time, but I made a bag to match.

This pattern makes a gorgeous dress, but I find that the bodice part is quite short and I add about 2 inches to the neckline and shoulder which makes it longer and allows enough fabric to make a casing for the elastic. The zip at the back would be better if it was an invisible zip as it would sit better on the curve of the skirt. Despite these minor issues, I made another version of this dress for my daughter for Easter - I'm on a roll! Pin It Now!  

Wednesday, October 20, 2010

Baby dress, Baby pants, and baby shoes

Another niece and her Christening means sewing and more sewing.

I originally had a metre each of these 2 fabrics. Firstly I made these for another niece, then I made this for my daughter, and I just had about enough to make the little dress, pants and shoes, with a bit (loads) of creative matching of bits of fabric, especially for the pants and shoes.

That makes 3 dresses, 1 dolls dress, 2 hairbands, 2 hats (one not pictured), 1 baby pants, 1 pair of shoes from 2 metres!

OK back to baby clothes ...


The dress pattern is Ottobre 3/2007#1, which I also made for another niece's christening. The last time I made it reversible, this time I didn't, but I lined the top part instead, to help hide seams inside.

This is a great baby pattern, easy to sew and should be few fitting issues because of the wrap-over at the back.


The Baby Pants pattern is Burda 6/2001#151. I lined these with the gingham fabric mostly to hide the seams where I was matching bits of fabric. The lining makes the pattern much simpler to sew.


For the baby shoes I used a Favourite Things pattern for ballet slippers.


(here they're stuffed with blue socks to help them hold their shape)


These are very cute, but really not at all practical. The sizes on the pattern go right up to adult size, can't really say they'd be for me!
Pin It Now!