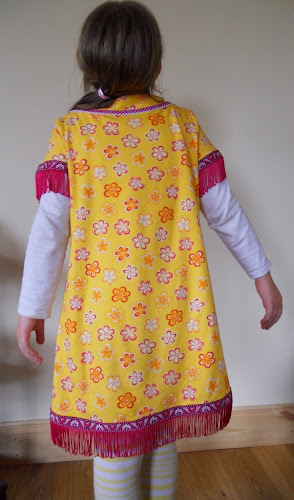
This girls dress is from the current issue of Burdastyle magazine 4/15 no.136. Every month there are a few children's patterns in the magazine and I have always liked their sizing and fit. This dress was no different. I graded up a size to 134, just to allow for some growing room, but the dress would have still fit well.
It's an interesting design, with the neck facing applied to the outside. It is also clearly well-designed as the facing fit beautifully and I love how neatly the shoulder seams align. This would be straightforward on a woven fabric, but usually much more difficult on a knit fabric.
The green stitched ribbon is placed under the shoulder seam while it is being sewn, and a second line of stitching is sewn along the ribbon and seam edge. Once the ribbon and seam are pressed it forms a neat finish to the seam as well as preventing the shoulder seam from stretching and sagging. Of course this is also a perfect way to use those tiny pieces of beautiful ribbon leftover from bigger projects.
I altered the pattern by not including a back opening, and not adding neckline and pocket piping. The instructions recommended sewing the side seams and then inserting the sleeves but it was much quicker to sew each sleeve to it's armhole and the sew each sleeve seam and side seam all at once.
I just had a day to sew the dress so unusually didn't consult my daughter on the fabric and the pattern, but she was thrilled to have a yellow dress and got very involved (obviously, I suppose!) in picking out the fringe and neckline trims.
Pin It Now!


what a fun dress - love all those trims. Agree on the sleeve insertion one seam easy peasy
ReplyDeleteThanks Amanda :-) it seems strange not to recommend the one-seam sleeve method for this pattern, but it is Burda, I suppose!!
DeleteI don't know if my original comment went through or not. I'm at Patrick's flag football facility and using their wifi and it has a tendency to cut in and out! So bear with me if I commented twice.;)
ReplyDeleteThe dress is cute and very fun! Love that fringe.:)
It must have ended up in cyberspace! Thanks Cindy, it's a perfect pattern for her age. Your girls would like it too.
ReplyDelete