Showing posts with label fabric online. Show all posts

Friday, April 29, 2016

A Ribbon-trimmed Fifi Camisole/Slip

Last summer Sew Crafty Online held a Facebook competition with a huge prize package. I couldn't believe that I won and was speechless when the incredibly generous prize arrived in the post. All of Tilly and the Buttons sewing patterns, with fabric, a carrier bag and a neat measuring tape were included.


It really is about time I sewed something from that wonderful parcel...


I picked the Fifi camisole pattern (extending the length), some beautiful AnnaMarie Horner voile fabric (from my stash), soft blue denim and sage gingham ribbons from Jane Means ..... et voilà!


This pattern was a very pleasant surprise - excellent & detailed instructions, easy to sew, neat finishing techniques, bias-cut and gently fitted shape. I hadn't expected these details from Tilly's patterns. My perception (inaccurate) was that her patterns were basic and mostly unfitted/loose as some of the earlier ones were.


I both simplified and complicated the sewing process. Using ribbons made it easier to create the straps, but making them adjustable needed a little more brainpower! I attached ribbon loops at the back and threaded the ribbons through. This was an easy alteration to make, and would be very useful if making the Fifi pattern as a gift with nobody available for fitting.


A soft ribbon like this denim ribbon is recommended as I was able to press it into shape, to conform to the curves of the pattern. Good pressing technique is crucial to make ribbons work for this pattern, and it is worthwhile for the time it saves in creating bias strips.


Not wanting to lose length at the hem, I sewed a tiny seam covered with gingham ribbon hem to preserve as much length as possible.

It was necessary to get very creative when I realised I was short a few cm of ribbon for the hem. I turned to another favourite ribbon company of mine, Farbenmix and added a woven patch and a short piece of one of their fun woven ribbons to cover the gap.


The beautifully neat, inside finishing details are, very impressively, all included in the pattern instructions. Usually I would have to figure out how to include these details myself.


Adding a ribbon to the hem is not included in the pattern instructions, but gives a little extra weight to the hem and also finishes it neatly - as seen from the inside.


All the inside seams are French-seamed and the inside back view shows how well the pattern is designed and styled for a closer fit at the back.


I love this pattern and have a bias-cut, ivory bamboo silk version with gingham bias trim and straps cut and ready to sew.


Pin It Now!  

Tuesday, December 30, 2014

Sleeping Beauty - A Costume for the Panto.

As Christmas (aka pantomime season) and my daughters birthday are close together, her godmother takes her to a pantomime in Cork, our nearest city. As part of this treat, my daughter likes to wear the costume of the main character. So in the past I've sewn an Alice dress, a Cinderella dress (not blogged), and this year it was Sleeping Beauty's turn.


Pink is the colour most associated with Aurora/Sleeping Beauty's dress, but in the film and books, she wears a different dress before she 'falls asleep'. Though my daughter hasn't quite left the 'pink phase'! she didn't take much convincing when I showed her pictures of the other dress worn by Aurora.
An online search for images of the dress, led me to pick View 2 of this vintage Advance pattern 5816 that I already had, because of its v-shaped bodice and skirt.
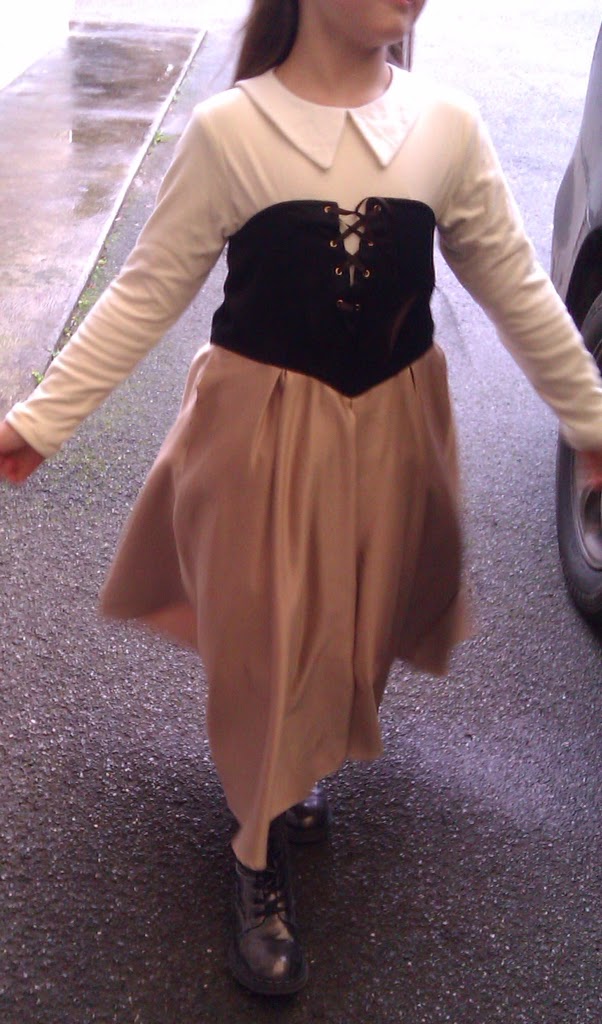
The main additions the skirt pattern needed was length, and extra fabric added to the centre front and centre back to create pleats. I also curved the top of the bodice at the front and back armholes and cut a centre front seam so that I could create a lace-up bodice.
The sleeves and upper bodice were adapted from Butterick 5890. I recently used this pattern for the Elsa Coronation dress which I sewed for Halloween. I had to draft the white collar myself using a flexible ruler, then measuring the neckline curve once I had sewn the shoulders of the front and back bodices. I've never drafted a collar before, so was surprised and pleased that it lay flat and looked so good.


The dress turned out exactly as we both imagined, especially the centre front which has eyelets and is laced up with narrow grosgrain ribbon.


The fabrics are all from Vibes and Scribes, a well-stocked fabric, wool and haberdashery shop in Cork that now delivers online. The top bodice is cream cotton jersey, the main bodice is a soft-textured black polyester, and the skirt is a medium-weight sateen which was the last piece on the bolt.


Though it seemed like I was cobbling together parts of patterns, and making up pieces and instructions as I went along, the dress worked and most importantly she was delighted with it.


Pin It Now!  

Monday, October 13, 2014

Fabric Search for Elsa's Coronation Dress

If it's Elsa, it must be Frozen! We were late to the Frozen party in this house, and finally bought the film during the summer holidays. It was watched on the few wet afternoons we had this summer, my 7yo daughter & 9yo son loved it, but the rest of us could be found openly watching & enjoying it too!


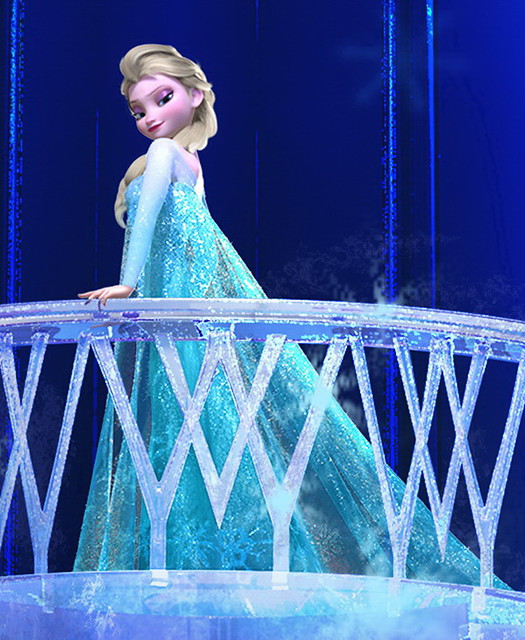
The most popular costume from the film is Elsa's shimmery blue Ice Queen/Snow Queen dress, but my daughter has her heart set on the coronation dress. There are excellent and detailed pictures on this blog -Arendellekingdom

Some research on the film and that dress has thrown up some interesting links. One of the most fascinating is from an illustrator on the film, Brittney Lee, who blogged about her design process. She also provided information on the interesting ’rosemaling' designs in the dress fabrics and throughout the film.

There is also an excellent interview with the costume designer, Jean Gillmore, from Frozen on the Tyranny of Style blog.

It was very interesting to discover that many of the illustrations of the costumes are based on the properties of fabrics from which the dresses in Scandanavian countries would have be sewn. For example the weight of a fabric would affect its drape and movement. This is reflected in the animation in the film.


With all this inside knowledge, I searched for fabric online which would be suitable for a child's costume, and accurately reflect the costumes in the film.

The Coronation dress in the film seemed like a wool fabric, but that would be the most impractical fabric for a child's costume. Then I considered velvet, which would drape and move in a similar manner to wool.Many velvet dress fabrics available online are polyester and stretch velvets or velours, which would probably be most suitable. but I was looking for a fabric with more weight, so was drawn to using cotton velvet, which is expensive to buy in Ireland.


It took me ages to find the kind of fabric I wanted, either it was too stretchy, too expensive, wrong colour.....

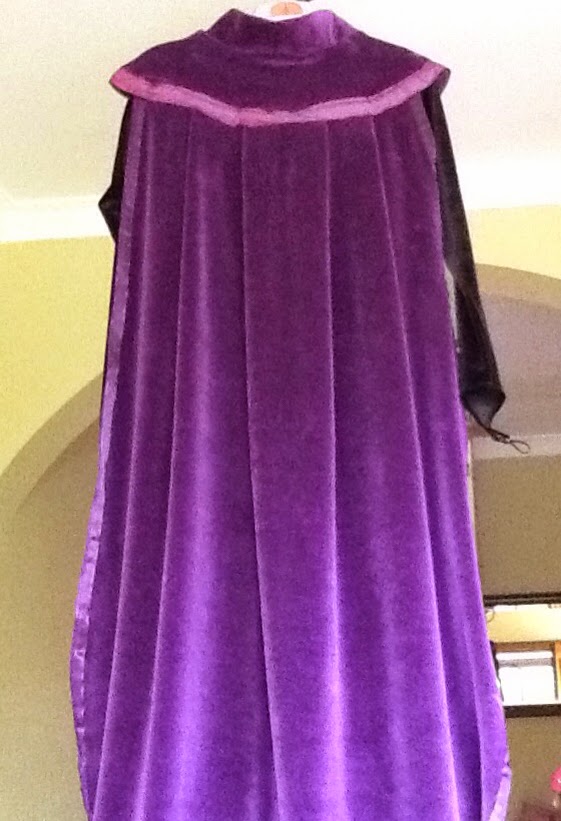
After a very thorough search, I eventually found the specific colours for the coronation dress in a cotton mix velvet fabric from Fjøelner in Denmark. It turned out to be the perfect weight and was delivered extremely quickly.


This is where I'm at....


I already had black velvet and a suitable pattern Butterick 5980 (ViewD with longer skirt and long sleeves), so the dress and the Cape have been sewn up. Now I just need to figure out how to add the floral/scrolling designs to the velvet on the dress!


Pin It Now!  

Monday, September 1, 2014

Basic Black - A Japanese Pattern Book Review

Basic Black is a book of sewing patterns by a Japanese designer Sato Watanabe. This is one of the more interesting and exciting Japanese Pattern Books that I have used, particularly because it includes patterns for garments that are designed with shape, rather than the usual loose fitting Japanese styles.


Unlike Sato Watanabe's Stylish Skirts book that I also reviewed, there is a lot less drafting, measurment and creation of pattern pieces in this book. Pattern sheets, which are printed on both sides, are included with the book.


What is most surprising about this book, is that the original publication date of the Japanese edition was 2005, but you would never guess that based on the designs in this English translation from Tuttle Publishing.


There are 26 patterns in the book - 7 shirts/blouses, 10 dresses, 8 coats/jackets/vests and 1 skirt in both loose and fitted styles. There is some minor pattern drafting needed, in approx half of the patterns. This involves adding length, facings, marking pleats, simple skirts & rectangular shapes.
The sizing is unlike most Japanese pattern books, in that the finished measurments of garments are shown. This means that when taking measurments to pick which size to sew, you need to consider how much ease you like and add this to your measurments before comparing them with the chart. This makes choosing a size awkward, but accurate. Taking this into account the largest size in the book is about the same as US size 16-18, but because the patterns are multisized, they could easily be graded up a size or two.
 
 
Garments are grouped into 3 different types of fit - those with shaping, fitted & loose, and there is even a fitted jacket.
Most of the patterns are at an advanced beginner level, with only 3 that I could identify as beginner.


Wanting to write a fair review the book, I sewed pattern 'w'. This is a pattern for a long sleeved knit top with an asymmetrical neckline finished with bias and an asymmetrical hem finished with ribbon trim.


In the introduction, Sato Watanabe writes about loving black clothes since she was a child. But I didn't quite keep to the colour ethos of the book .....

...... it's more of an 'Orange is the New Black' look! The orange jersey was bought recently from Volksfaden.de and the ribbons are from janemeans.com


The pattern indicated that the neckline should be finished with bias, but I chose to match the neckline with the same brown striped ribbon that I used on the front and back hems. As jersey tends not to fray, I sewed the ribbon directly onto the outside of the fabric with a long stitch.


The sleeves were cut in three pieces and slightly narrower than indicated because I had only 1metre of fabric. I added flat piping between the sleeve seams and sewed the sleeve hem with sage green stitched grosgrain ribbon also from Jane Means. The technique I used for sewing the sleeve hem is one I used before and described in detail here


There are quite a large variety of sewing techniques illustrated in the clear diagrammatic form that Japanese Pattern books are renowned for. These techniques include facings and bindings as well as collars and plackets among others. Each part of the technique is drawn in detail and diagrams are numbered to make them easier to follow.


The fit is exactly as it looks in the book picture, except that my sleeves are narrower. I also added about 5 cm of length to the front and back as the top seemed shorter than I preferred. Because only finished garment measurements are given in the book, I measured my pattern pieces against a RTW top to make sure I picked the correct size.

This book is beautifully presented and has an excellent selection of diverse patterns for coats, dresses, skirts and tops in loose, semi-structured and fitted styles. It took me ages to decide on a pattern to sew because there are more that I want to make, including a zip-up jacket, two dresses and a shirt.


(Tuttle Publishing sent me this pattern book free. All opinions are my own. I have been happily sewing from Japanese language pattern books since 2009)


Pin It Now!  

Wednesday, July 30, 2014

Fun Sewing for A Toy Wedding

Not having much time for big sewing projects over the school holidays, there are still ways and means of getting some sewing in....


When my 3 year old niece wanted two of her toys to have a wedding & I got a request for simple wedding outfits, I needed no further excuse to get back to my machine.


This McCalls pattern 6005 was bought quite a while ago and it was a complete surprise when I realised that I had already cut out and organised all the tiny pattern pieces. The patterns don't quite shout 'wedding', however the pyjamas top was easily transformed into a wrap-around wedding dress by adding length and layers to the skirt part. The patterns for the leopard print coat and trousers were used for the grooms suit.


The veil, bow tie and shirt collar piece were my own creations! The fabric and trims were scraps and small leftover pieces, chosen on the premise that anything lacy and sparkly would appeal to my niece.
 
 
The 'wedding' had all the trappings of a true Irish wedding, though on a smaller scale in my brother-in-law's house with a meal, dancing, a disco and finishing with the national anthem! Of course, everyone was also talking about the clothes...


As an extra surprise for my niece, I sewed tiny (teaspoon-sized!) aprons as 'housewarming' gifts for the 'newly weds', inspired by the aprons I sewed in this post.


The grooms apron is Parsons Gray laminated cotton with janemeans beige narrow stitched ribbon as ties and a headband.


The brides apron is an Amy Butler laminated cotton, bought from this Irish shop (Pippablue). It has a Liberty print fabric pocket, janemeans narrow slate stitched ribbon ties, as well as a matching headscarf. The elastic was added to the ribbon at the neckline with a simple zig-zag stitch, to ensure the apron would fit over the head.


These little aprons were kindly modelled by Mickey and Minnie, before being delivered to a very appreciative niece.


Pin It Now!  

Wednesday, July 31, 2013

Sewing on a Budget: A Summer Dress in Black...& Red

This month I sewed a black cotton summer dress with with a really great stretch cotton from Abakhan Fabrics.
The project got off to a bad start as I thought I was ordering a black cotton jersey and intended sewing boy's t-shirts, so when this lovely cotton arrived I had to rethink. Salme Patterns have a free pattern for a dress that I've wanted to sew for a while, so I sewed the Sonja dress.
There are just 4 pattern pieces, so it isn't a very difficult pattern. The only slight changes I made were to add bias binding to the neckline and armholes, and to sew an exposed zipper. The binding and zipper both came from my stash.
Despite measuring the pattern pieces carefully and comparing my measurements, I had a problem fitting the bodice. It was much too large at the lower part of the armholes so I had to take about 4 cm from each side, tapering down to zero at the waist. Because of this I think the bodice lost some of it's shape at the armholes, and ended up overfitted.

One part of the pattern that I particularly loved was how the bodice darts and side seams aligned perfectly with the side seams and pleats of the skirt. (The picture is over-exposed to show the detail).

I'm not sure if a red exposed zipper was the best idea, but it was all I had. I used this method which I found on Burdastyle to sew the zipper. Though I like this method, I think the one illustrated by Pattern Runway would have looked better, as less of the red zipper tape would show.
The Burdastyle method allows for a neat finish inside.
The cost of the project was as follows
Cotton 97% Elastane 3% Fabric - white version £7.85 x 2m = £15.70
Free pattern
Binding from stash (similar available)
Zipper from stash (similar available)

As I used about a meter and a half, the dress cost approx £11.00.

And the modelled pics! Roles have very much reversed around here recently, my 6 year old loves being asked to take pictures. She took these pictures and is a natural behind the camera!
Pin It Now!  

Sunday, June 30, 2013

Sewing Teacher Gifts

For the last few years I have sewn gifts for the children's teachers. I've tried to make useful items like tote bags, and make-up/pen rolls. Perhaps it would be a lot easier if I made the same thing every year, so I wouldn't have to rack my brain for inspiration!!!

This year the inspiration came from my daughters teacher who, at the parent-teacher meeting, was using a plain copybook where she had recorded notes about the students. I thought that a brightly coloured cover with ribbon bookmarks would be easier to see on her desk and more cheerful than the copy cover.


I had a look around the Internet for a pattern, but none were exactly what I wanted. I measured a standard copybook and drew up a pattern.


The pattern involves 2 large rectangles for the front and inside, 2 smaller rectangles for the cover holders, 1 rectangle for the pen holders, elastic and ribbon.

The front, inside and 'cover holders' are interfaced, but the pen holder on the front is just a double layer of fabric.


My favourite part are the bookmark ribbons. I used green and purple narrow stitched ribbons from JaneMeans for the blue/green cover, and red/cream vintage stitched ribbon for the red/blue cover. They just matched perfectly!


To keep the covers closed, I considered Velcro. It works very well, but can get raggy from a lot of use. So I went with elastic, and luckily I had some coloured elastic to chose from. White or black elastic would not have looked as good!


Most of the fabrics are Riley Blake designs from The Fabric Loft UK, with the blue floral from my stash. Ribbons are from janemeans, the purple stretch trim is from Abakhan Fabrics and the green elastic from my stash.


The biggest lesson I learned was to make the pattern pieces about 2.5cm/1inch bigger all around than the copy/notebook measurements, and sew with seam of 1cm. This allows for the depth of the copybook as well as the topstitching.

The first attempt wouldn't fit a copybook! But it was very helpful to have a practice version.


Pin It Now!  

Friday, May 31, 2013

Sewing on a Budget - Boys Vest & Father's Day Ties ..

.. & suggestions for selecting sewing pattern sizes


It's been quite a while since I sewed for my boys, and even longer since I sewed a waistcoat. As we had a family occasion to attend, I decided it was time I sewed something dressy for my 8 year old son. This Simplicity 1745 pattern is excellent value as it has both boys and men's sizes, and the mint striped cotton from Abakhan Fabrics was just what I was looking for.

I don't often use sewing patterns from the 'Big 4’ ( Vogue, McCalls, Butterick & Simplicity) as there is so much ease included that they turn out too big. (There's some excellent discussion about this around the Internet at the moment - links here)

However, I liked the look of Simplicity 1745 and I wanted to see if I could work out the sizing.

How to sew the correct pattern size for a child's garment:

  • When selecting a pattern use the 'Finished Measurements' if they are included to make sure the pattern is within the child's size range.
  • Take two sets of measurements - first take the usual body measurements with the tape close to the body, then take a second set holding the tape out a little from the person allowing for ease (room to move - eg. get them to bend & stretch with the tape around them!).
  • Measuring a similar garment that the person wears can also help with estimating the amount of ease that's needed.
  • Compare the second set of measurements to the actual pattern pieces, taking note of/adding on the seam allowances.
  • Select the size lines that are closest to the second set of measurements.
  • For example: my sons second set of measurements meant that I had had to use the Boy's Small size line for his width, but use the Large size line for his height/length.
  • Also take note of the shoulder (base of neck to top of arm) measurement. These patterns tend to have a wide shoulder shape, so I measured his shoulder, added seam allowances, and marked this on the pattern.


I liked how this pattern looked sewn up, though the shoulders were still a little wide. The instructions were clear and easy to follow. The boy's version could probably do without the curve on the back seam and the front darts, especially for a narrow-shaped child. The pattern would be even quicker to sew up if these were omitted.


When searching for buttons on Abakhan, I was delighted to come across these ceramic animal shaped buttons from Injabulo. These were on sale and are a fun addition to children's clothes.


Boys and dinosaurs are practically a given, especially for my 8 year old who knows about things like what dinosaurs lived in the Jurassic age! So I chose a fun dinosaur cotton print for the waistcoat/vest lining. This is a great print and the all the dinosaurs have mirror images which means the shapes could be cut out, sewn right sides together leaving an opening, then turned and stuffed to make little toys.


'Somebody' was very impressed with his dinosaurs! My son loved that I made him this vest and tie with the dinosaur lining and loved how 'cool' he looked.


I couldn't resist sewing the tie to complete 'the look'! I have sewn ties before and because they are cut on the bias, they can be difficult to sew. This tie pattern worked out very well, and I altered the pattern to include lining at the ends for which I fussy cut the dinosaur fabric!

I was so impressed with the tie pattern that I got completely ahead of myself and ........


...... sewed up two ties for Father's Day (for my husband) with fabric from Abakhan that I used in previous projects. The tie with balloons might be a little over-the-top!!! but I quite like the tie with the red lines.

The cost of the fabric and notions for the waistcoat and tie were:

Mint ticking-stripe cotton fabric x 0.5 metre £3.27

D-rings x 1 packet £1.45

Cotton dinosaur fabric x 0.5 metre £3.63

Simplicity Pattern Boys & Mans vest and tie 1 x £4.06

Incomparable ceramic buttons 5 x £1.72 (also available here)

(No extra cost for the Men's ties)

TOTAL = £12.13

I thought this project was exceptionally good value. As I had a shirt and trousers already, this was the cost for a waistcoat and a tie. I don't think they could have been bought in a shop for that!


(The fabric and notions for vest and tie were chosen by me and supplied by Abakhan Fabrics, free, as part of their challenge to sew on a budget)


Pin It Now!